
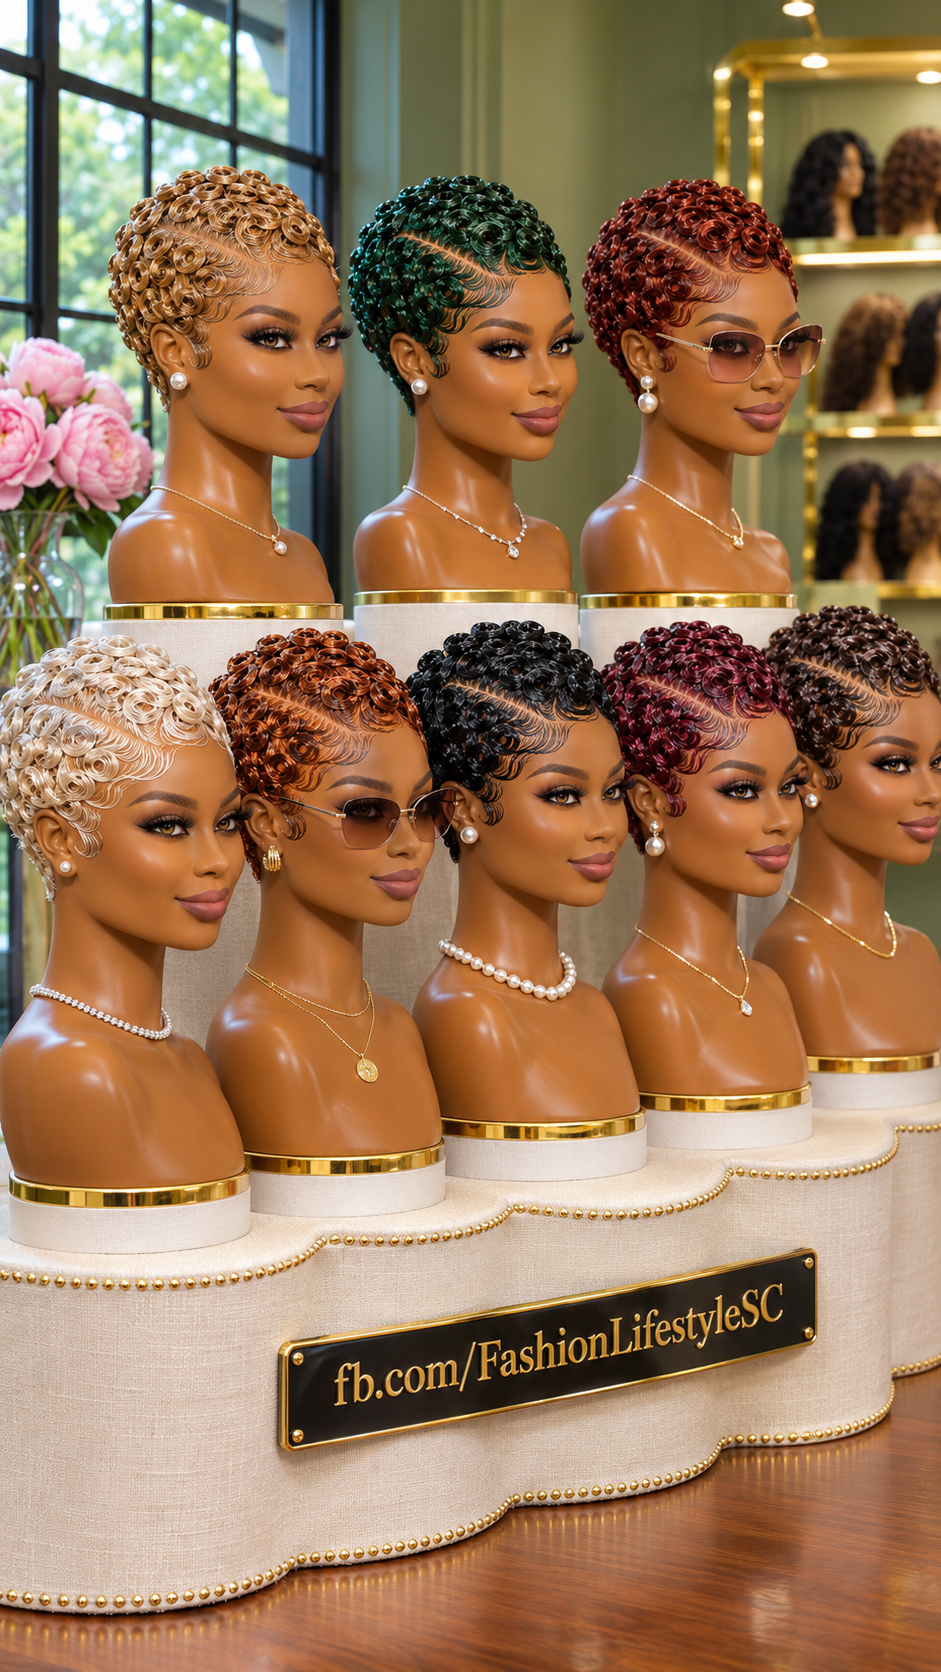
A deep side part gives this pin curl pixie its unmistakable shape. Above the part, small curls sit in glossy circles that follow the crown. Below it, fine strands sweep across the forehead before curving back toward the temple. The contrast between the raised curls and the low, carefully combed waves gives the hairstyle the polish of a vintage set while keeping the silhouette close to the head.
The visible side is as interesting as the front. A cluster of rounded curls sits above the ear, where it meets a narrow sideburn curl that turns back toward the hairline. That little turn gives the style a graceful finish in profile. It also shows why a three-quarter photograph is so useful when choosing a short wig. From straight ahead, you can admire the sweep across the forehead. From an angle, you can see how that sweep connects to the curls at the side.
Color changes which details catch your attention first. The platinum blonde version shows the fine lines in the front waves particularly well. On the black wig, the part stands out against the dark crown. The emerald version reads deep and rich between the curls, while the light brings out green along the bends. Honey blonde, chocolate brown, copper, burgundy, and a deeper red give the same shape different degrees of warmth.
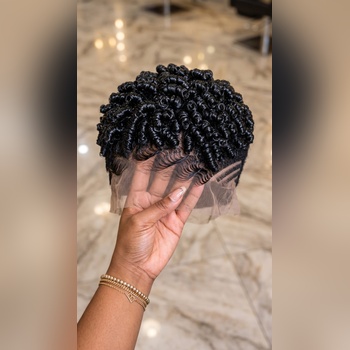
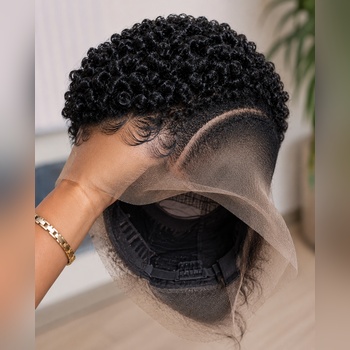
If this is the pixie you want to wear, save the reference and pick the version whose shape you like as much as its color. Pay particular attention to where the part starts, how far the front wave reaches, and where the curl beside the ear ends. Those are the details that help a wig maker or salon reproduce the look on your proportions. They also give you a way to judge a ready-made wig before paying for it.
The Side Part Sets the Direction
The part runs diagonally from the front into the top, making the crown look as if it has been combed into two distinct sections. The wider section carries more of the rounded curls. Along the narrower side, the hair curves down toward the temple and around the ear. Keeping that line visible gives the curl pattern room to breathe. If the first row of curls spills too far across it, the top starts to read as a single mass of curls.
When you try the style on, look first at the part from eye level. A mannequin can show the direction beautifully, but the same placement may fall closer to your brow or farther into your hairline. Ask the stylist to show you the line in two positions before setting the waves. A small shift toward the center can give the front wave more room to spread. A deeper placement can make the sweep feel more pronounced, especially if you like the asymmetry of a short cut.
If you are used to parting your hair on a particular side, tell the maker which side you mean from your own point of view. Selfies and mirrored photos can make left and right hard to interpret. A quick annotation on the reference solves that problem. It is worth settling this detail early because a pre-styled wig may have a fixed part, and changing its direction can mean reworking the entire front and some of the crown.
How the Curls Sit Close Without Looking Flat
Across the top, the curls have visible circular centers. They sit close enough to form a continuous outline, yet the individual bends catch the light separately. Some loops look wider near the front of the crown, while the curls around the ear read as smaller and closer to the head. That shift in scale gives the pixie its rounded profile without making the sides look heavy.
If you are commissioning the style, describe the result as a close set of visible loops. A request for short curls alone could produce a soft, brushed pixie or a much tighter coil pattern. Ask to see a sample curl before the whole crown is styled if the maker offers that option. You can judge whether the center stays open, how high the loop sits, and whether it still has the shape you liked in the reference from a normal viewing distance.
The area around the ear deserves its own fitting check. A curl that looks dainty on a stand may brush your glasses or sit lower on your cheek than you expected. Bring the frames, studs, or hoops you usually wear and try them during the appointment. The copper and deeper red wigs in the image show how closely the frames sit to the temple work. If you wear glasses daily, ask for a little clearance where the arms pass the hairline, especially if you plan to remove the glasses frequently.
What Each Shade Brings to the Same Pixie
Black and chocolate brown make the shape easy to wear with a wide range of clothes and accessories. Black gives the strongest contrast at the part and lets bright reflections trace the tops of the curls. Chocolate brown has a softer effect. Its warm highlights are especially visible along the curves near the forehead. If you want the hairline to blend gently into the rest of the style, compare the two under daylight as well as indoor light.
Honey blonde brings out the fine comb lines in the wave, while the palest blonde gives those lines an almost drawn-on clarity. The front edge also gets more attention when the hair is very light. For a pale unit, ask for a close-up of the part and perimeter on a person with a comparable skin tone if the seller has an appropriate example. You can also ask to see the lace, if the wig uses it, against a similar shade of backing or a tint sample.
The copper wig has a bright reddish-orange warmth, especially along the loops facing the light. The deeper red in the upper row has more depth in the curl centers, and the burgundy near the front looks closer to a wine shade. Those differences can be difficult to judge from a listing that uses the same name for several reds. Ask for a daylight video that shows the unit turning slowly. Look at the color inside the curls as well as the highlights, since the shadow tones often determine how the wig reads in everyday wear.
Emerald is the most pronounced departure from natural hair shades in the display. Its darkest areas appear nearly black, with green becoming clearer along the ridges of the curls. If that depth is what draws you to it, tell the maker you want a dark jewel tone and send a reference for both the shadow and the brighter reflection. For any colored unit, agree on the shade before the final set. A tight curl pattern creates more visible shadows than straight hair, so a color swatch gives you only part of the picture.
How To Order This Style
Look for short units at local beauty supply shops, specialist wig retailers, and custom wig studios. Search portfolios for side-parted pin curl wigs, short finger-wave sets, and closely fitted pixie units. Look for finished work photographed from the front and both sides. A shop may carry a ready-to-wear pixie with the right outline, while a local wig stylist can help you decide whether its fiber, length, and parting area will allow the additional curl work you want.
When contacting a maker, send the reference and mark your preferred shade. Specify the part direction, the amount of forehead you want exposed, and whether you want the sideburn curl close to the ear or slightly forward. Provide your measurements using the maker’s guide. If you have a preference for the nape, add a separate reference for that area. The display gives a good view of the fronts and visible sides, so a back reference is especially helpful for agreeing on the finished outline.
Before paying, ask for photos of the actual stock unit or written confirmation of the specifications for a custom order. Request a daylight close-up of the hairline, a view of the top and part, pictures of both temples and the nape, and a photo of the cap interior. Confirm the fiber, sizing, parting space, and any adjustable straps or bands. Ask whether the curls and front waves arrive set and whether any final cutting or fitting is included. For a custom order, confirm the deposit, production time, shipping costs, and how the maker handles fit adjustments.
For a salon appointment, look for a stylist who regularly works with short hair, finger waves, and pixie cuts. A portfolio with side views tells you how the stylist finishes the temples and nape. If you want the look on your own hair, book a consultation and ask how your current length, texture, and existing cut will affect the result. If you are bringing a wig, share the fiber information and photos when booking. That gives the salon time to tell you whether you need a full cut and set, a front restyle, or a fitting followed by curl work.
Choosing a Cap That Supports the Part and Temples
A lace-front wig can be a good starting point when you want a visible hairline and finely placed forehead waves. Ask how far the lace extends into the top. The diagonal part needs usable space behind the front edge, and lace-front designs vary in how much they provide. A closure wig can suit a fixed part if the closure covers the position you want. Check the transition near the temple, particularly when you want to wear that area exposed.
A frontal wig gives the stylist room to work across a wider section of the hairline. It can make sense if you want detailed shaping at both temples or need flexibility to adjust the part during a fitting. Full lace is worth discussing if you expect to change the part regularly or wear several short sets on the same unit. A pre-styled cap with a fixed part can also work well when its existing hairline and shape suit you. Ask the seller to identify the construction of the unit you are considering before you compare those options.
Fit matters because the compact cut follows the head closely. Take the requested measurements with your own hair arranged as you plan to wear it beneath the wig. Check the placement of both ear tabs and the nape when you try it on. Turn your head, look down, and put your glasses on if you wear them. If the cap lifts or changes position during those movements, address the fit before the stylist sets the waves in their final place.
Glueless Wear and Salon Installation
A compatible glueless wig can make it easier to remove the unit after an event and store the curls upright. Adjustable straps, an elastic band, or the maker’s recommended attachment system can help a correctly sized cap stay in position. Start with enough tension to keep the unit steady and check how the band feels after a few minutes. If you feel pressure near the temples, ask the fitter to check the cap size and where the tension sits.
Adhesive installation is another option for a compatible lace unit when you want the exposed perimeter secured. Ask the stylist how they will place the hairline, what the appointment includes, and how the adhesive should be removed. Settle the fit and part placement before the final edge work. The wave above the eyebrow and the curl beside the ear depend on where the cap sits. A small shift during installation can change the look of both.
Finding the Right Density and Finished Length
Choose the crown density with the intended curl size in mind. Each roll needs enough hair to form a visible loop, while the spaces between loops help show the pattern. Extra bulk can close those spaces and add height at the widest part of the head. Show the maker a side view and explain how close you want the silhouette to sit. Ask how they will keep fullness across the top while leaving the hair around the ears light enough to shape.
Compare the finished length at the crown, temple, and nape individually. Hair that looks long enough when stretched may sit much higher once rolled. The opposite can happen around the ear, where even a little extra length can crowd the sideburn curl. If you are buying a wig for a salon to customize, send the stylist the listing before you order. They can tell you whether the starting length and distribution give them enough hair for the curl set and the swept front.
Illustrative Prices for a Side-Parted Pixie Wig
These estimated USD ranges are for comparing different levels of work. The final quote can vary with the fiber, cap, shade, seller, location, customization, shipping, and installation. Ask for the unit and salon services to be priced separately if you are buying from one business and booking the fitting with another.
| Category | Illustrative Price Range | Potential Scope |
|---|---|---|
| Premium Custom | USD 400–850+ | Made-to-measure fit, custom shade, individually placed curls, and detailed work around the part and temples. Confirm fitting costs separately. |
| Standard Custom | USD 220–420 | Existing base unit customized with a selected color, fixed side part, and coordinated pin curls and front waves. |
| Basic Human Hair | USD 100–240 | Short human hair unit that can serve as a starting point for a salon cut, fitting, and curl set. |
| Premium Synthetic | USD 55–135 | Pre-styled pixie with a more detailed crown or hairline. Confirm the part direction and any restyling limits before purchase. |
| Basic Synthetic | USD 20–60 | Budget short wig with a comparable outline and simpler curls or waves at the front. |
Keeping the Pin Curls and Front Waves Intact
After each wear, check the front for makeup transfer, product residue, or an area that has lifted out of shape. Hold the cap when you move the wig and adjust individual curls with your fingertips. A brush pulled over the entire crown can blend the loops together. If the stylist has given you a compatible product for the edge work, use a small amount on the section that needs it. Layers of dried product can collect between the fine strands and dull the finish.
For frequent wear, set aside a few minutes each week to inspect the inside of the cap, the part, and the curls near the ears. Base the wash schedule on how often you wear the unit, how much buildup you see, and the maker’s instructions for the fiber. If the residue is mainly around the hairline, ask whether that area can be cleaned separately. Support any lace as you handle it so the pressure stays off the fine front edge.
A human hair wig with a wet set may need its pin curls and finger waves formed again after washing. Some synthetic wigs hold a factory-set curl when washed and dried as directed, while others have specific limits on how much they can be reshaped. Follow the care instructions for drying and check the fiber’s heat guidance before attempting any reset. If the wig can air dry on a stand, leave enough space around the sides for the waves and sideburn curls to dry without pressing against another surface.
For blonde and platinum shades, pay attention to makeup or tinted styling products near the hairline. For copper, burgundy, or emerald, ask the supplier which cleansers are compatible with the color and fiber. Store the unit upright with space around the crown. When traveling, support the cap from the inside and use a container with room above the curls. If the part has shifted or several waves have loosened, take a clear photo from the first fitting to a stylist who can reset those sections.
What Makes This Pixie Worth the Upkeep?
The short outline leaves room for earrings, glasses, and higher necklines, and the curled crown gives the haircut enough detail to stand on its own. A familiar shade such as black or chocolate brown can make the look feel understated in daylight. Copper or emerald lets the same curl work become more noticeable, especially in photographs. The best part to customize is often the one you see first when you put the wig on, whether that is the sweep above your eyebrow or the profile around your ear.
The trade-off is that the low waves and individual loops need careful handling. A tight hat can flatten the crown, a pair of glasses can catch the sideburn curl, and a fixed part limits how far you can change the direction. A ready-made unit can suit occasional wear if the fit is right from the start. If you plan to wear the style often, a fitting gives you time to test your glasses, check the hairline in daylight, and settle on a curl height you can comfortably maintain.
Search Terms
side parted pin curl pixie · short pixie wig with finger waves · emerald pin curl wig · platinum blonde finger wave pixie · copper sculpted curl pixie · burgundy side part pixie wig · honey blonde pin curl pixie · black pixie wig with temple curls