
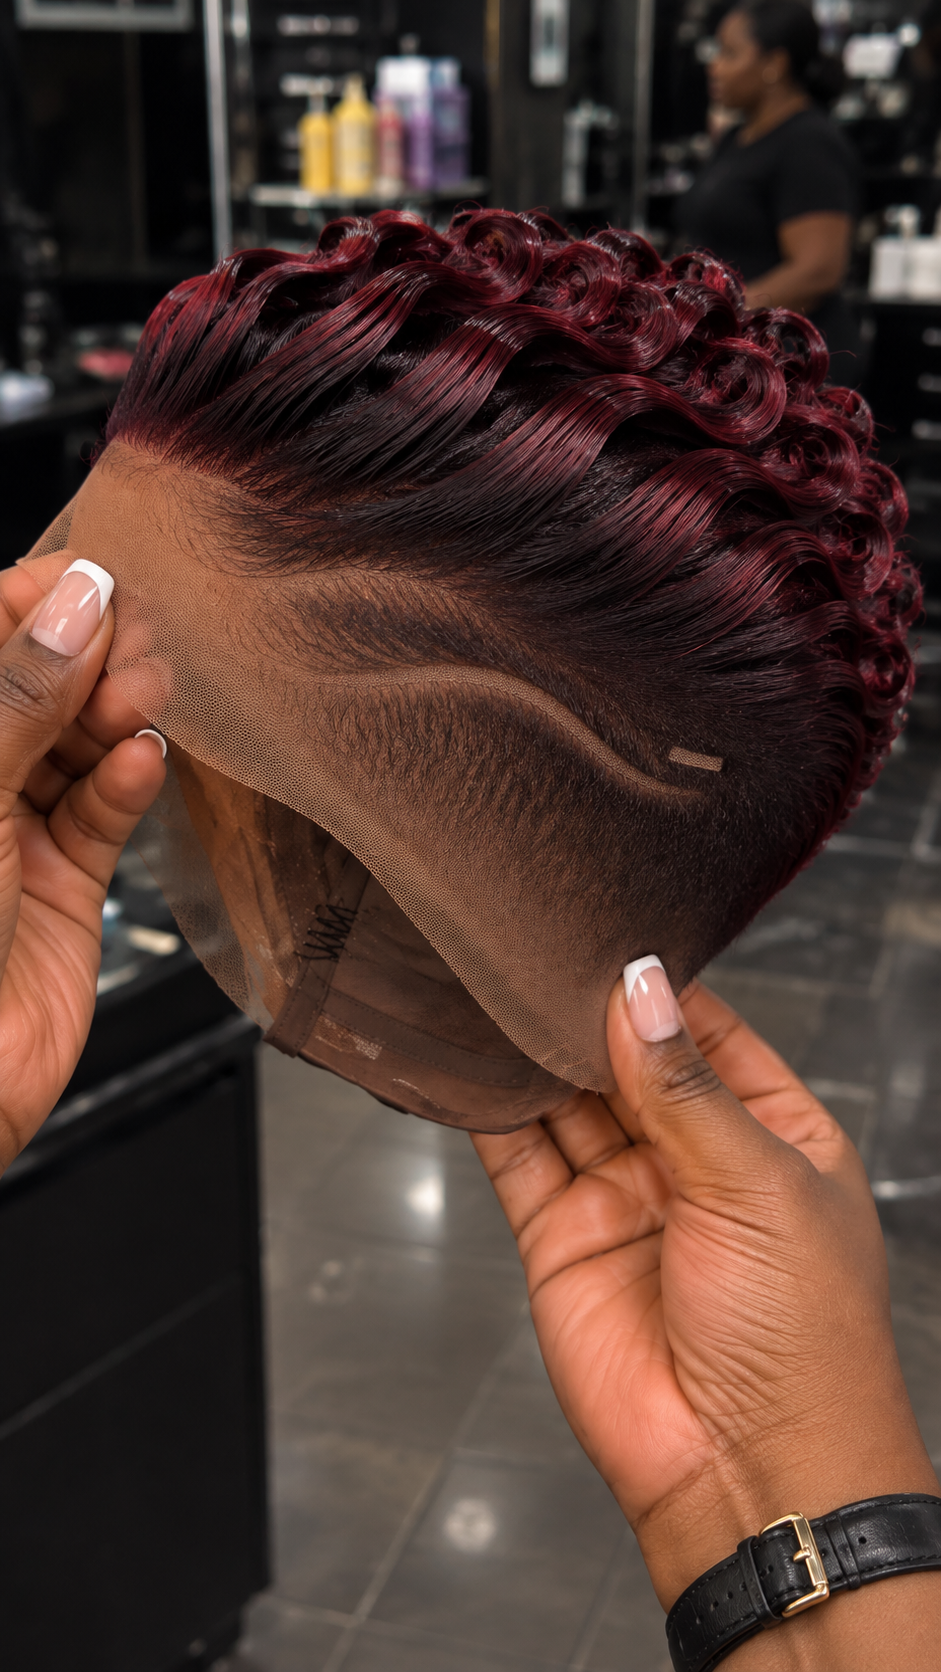
The first wave on this pixie rises from a nearly black hairline before it turns wine red. Behind it, broad sections repeat the movement, lifting away from the dark base and bending into glossy S shapes. The red is strongest on the outer curves, where the strands face the light. At the crown, those long bends end in smaller loops, leaving a rounded outline even though the hair has considerable lift across the top.
The visible temple sits close and dark beneath that fullness. A curved line passes through the short hair, with a small exposed accent near its outer end. Its position follows the shape of the side and keeps the silhouette open around the ear. In profile, the eye moves from the dark base at the front to the first flash of burgundy, then back down to the low curve. The short length gives both details room to show.
Two hands hold the wine red pixie wig open, revealing brown lace and a small comb inside the cap. Fine hairs lie along the front edge, where the dark roots will sit closest to the wearer’s skin. This angle helps explain the design to a wig maker. You can show where the red comes into view, how high the waves rise and where you want the temple line to end once the wig is fitted.
Read the Color From the Hairline Back
The hair nearest the forehead looks almost black. Through the longer sections, the color shifts into a deep red with cooler wine tones in the shadows and brighter cherry reflections on the crests. Those differences are easiest to see where a wave bends toward the camera. For a similar piece, decide how much red you want visible when you look straight ahead. The reference offers plenty of color in profile, while the dark front gives the eye a moment to settle before the red appears.
If you want a stronger burgundy impression from the front, ask the maker to bring the colored portion closer to the first bend. If you like the darker appearance around your face, ask for a longer stretch of dark hair before the red becomes prominent. Be specific about the first wave. Its placement can change the way the whole wig reads in a mirror, even when the rest of the crown carries the same blend. A side photograph and a straight-on photograph of an approval sample will show whether the transition starts where you expected.
Compare the colors in daylight and under the kind of indoor light you use most. Wine red can appear almost brown in a dim room and look considerably brighter near a window. If the wig is already made, request a brief video of the actual unit turning slowly. Watch both the outer crest and the inside of a loop. You want enough contrast to see the shape in softer light, especially if you intend to wear the style to evening events or spend most of your day indoors.
A Temple Line That Works With the Ear
The main curve reads clearly because the surrounding hair is short and directed close to the side. There is a broad dark area above it, then a narrower section below. The pale line bends as it approaches the outer edge, where a small broken accent appears nearby. Show both details to the maker if you want a close interpretation. A standalone arch and an arch with a short accent give slightly different impressions, particularly when they are placed near the frame of a pair of glasses.
Choose the distance between the curve and the ear during a fitting. The cap is held open in the reference, so the line will look slightly different when it follows a person’s head. Ask the stylist to place the unit at the intended hairline, then check the side at eye level. Put on your everyday glasses or sunglasses if you wear them. You can see whether the arm crosses the short accent, presses on the hair above it or sits comfortably below the design.
Decide how much of the taper you want visible around the lower edge. Some wearers prefer a longer section beside the ear, especially if they like a little more coverage at the temple. Others want the design to sit above an open ear so earrings remain easy to see. Tell the stylist which accessory you want to wear with the wig most often. Ask for the opposite profile and a rear view as well. The source photograph centers on one side, and those extra views let you choose how the short hair should continue around the back.
Get The Details On This Wig
Look for specialist wig boutiques, beauty supply stores that stock short styled wigs and custom studios with examples of dark-rooted burgundy waves. For this design, a side photo gives you more information than a listing that shows only the shade and the front. Look for a distinct difference between the height of the crests and the closeness of the temple. If a ready-made unit has the right color and top, ask a local stylist to assess whether its cap and side hair can support the curve you want.
For a custom order, send the reference with three details marked. Indicate where the red begins on the first raised wave, identify the long temple curve and point to the shorter accent if you want it included. State the intended side from your own perspective, since phones can mirror a photograph or selfie. Include the maker’s requested measurements, your preferred crown height and any request for clearance around glasses. A short annotated photograph can settle those choices more efficiently than several messages about the overall look.
Before paying, ask for a view from the front, both profiles, the back and the complete inside of the cap. Confirm the fiber, lace shade, size range, adjustment components and whether the lace comes trimmed. If the unit is available immediately, ask for a video of that specific piece. For a made-to-order unit, check when you can approve the color and side placement, how long the work is expected to take and which alterations are included. Ask the seller to confirm delivery costs and the terms that apply after the lace is cut.
To book locally, look for a wig stylist whose portfolio includes molded waves and close temple finishes. Send the photo before reserving an appointment and explain whether the unit is already styled. Fitting a finished wig and building a complete wave set from a plain base take different amounts of time. If you want the style on your own hair, ask a short-hair specialist and a barber to review the reference together, or find a salon that offers both services. The stylist can assess how much length the top needs while the barber plans the height and position of the side curve.
A Cap That Holds the Design Where You Want It
The photograph shows brown lace along the front and visible side, plus a section of the interior and a comb. To choose a similar unit, ask the maker to show what lies behind the entire temple panel. A lace-front wig can suit the style when its usable area reaches the intended curve. A frontal may offer more room around the temple, depending on its dimensions. Have the maker mark the planned side line on an image of the proposed cap so you can see where it falls in relation to the edge and any nearby seam.
A closure can work for an interpretation that keeps the front fixed and gives the maker a separate way to finish the patterned temple. If you want the tiny exposed accent as well as the main line, ask to see a similar closure build before choosing one. Full-lace construction can give a maker more options for where to place the side detail, especially if you want it to extend farther toward the back. Compare the available area and the fit of the actual cap. A wider area only helps if it reaches the part of the side where you need it.
For a glueless installation, ask how the comb, band and any adjustable straps work together. Follow the seller’s instructions for circumference and include ear-to-ear or front-to-nape measurements if requested. At a fitting, look down and turn your head, then check whether the long curve returns to the same position above the ear. If one side rides up or the comb presses, have the fit checked before the lace is trimmed. The test is easier to repeat with the same hair preparation you plan to use under the wig at home.
An adhesive installation can add hold on a compatible lace unit. Ask the stylist to place the wig first and show you how the brown lace looks at the front edge and inside the visible curve. Once the position is agreed, discuss the removal product that matches the adhesive and ask to see how the edge is released. If you plan to remove the wig every evening, tell the stylist before choosing a method. The shorter hairs around the temple receive more handling with frequent removal, so the routine should suit the amount of time you have between wears.
Fit the Waves at Their Finished Height
Each wide wave uses length twice. The hair rises from the front into the first crest, then bends back toward the smaller crown loops. An inch measurement describes the strands, while a profile photograph shows the amount of lift you will actually see. Ask for both before ordering. If you prefer a lower top, discuss leaning the first few waves farther back. That can retain broad burgundy crests while reducing how far the wig rises above the forehead.
Density needs to support the ridges and preserve the spaces between them. Too much hair near the front can fill the dark valleys, making the red appear as one continuous area across the crown. Too little hair may leave the larger crests looking thin or make them difficult to set in wide sections. Ask where the maker would concentrate the fullness. A little more around the upper crown can produce a rounder outline, while lighter coverage near the temple can keep the long curve easy to see.
When reviewing photographs before delivery, compare a view from eye level with one taken slightly above. The first shows how the front wave will frame your face. The second shows how the red is spread across the entire crown and where the smaller loops begin. If a wave covers too much of the dark transition, ask whether its direction can be adjusted before changing the color or density. Moving one wide crest can expose more of the base and improve the spacing around the neighboring curls.
What the Quote Should Cover
The five tiers below are illustrative USD ranges for planning a purchase. Actual quotes depend on the fiber, cap, source of the color, customization, supplier and location. Delivery, fitting and later resets may be separate. Ask whether the amount includes the wine red blend, the raised wave set and the temple curve. A wig in a similar shade can still require separate appointments if the top needs to be set and the side needs to be shaped.
| Tier | Illustrative Price Range | Potential Scope |
|---|---|---|
| Budget | USD 20–50 | Ready-made synthetic pixie in a wine shade with fixed waves and a simple side. |
| Value | USD 50–115 | Pre-styled synthetic unit with dark roots, fuller waves or a short temple accent. |
| Mid | USD 100–205 | Short human-hair base, with coloring, styling and the first fitting potentially billed separately. |
| Premium | USD 180–345 | Custom finish on a standard cap with selected burgundy placement and a shaped temple panel. |
| Salon-Grade | USD 345–675+ | Made-to-measure cap with tailored lace placement, individually shaped waves and side work checked at a fitting. |
Compare prices for the same finished result. If the red placement matters most, a pre-styled piece with the right blend may leave room for a local fitting and a simpler side. If the long curve is central to the style you want, ask a maker to price it before you buy a base. Check whether the salon can work with the chosen fiber and cap, and budget for a later reset if you expect to wear the wig often. If you are ordering internationally, confirm the total in your currency and ask which delivery charges the seller can include in the quote.
Keep the Wine Shade and Wave Set Looking Fresh
After each wear, look at the first red crest and the edge of the long temple line. A scarf can press down a crest, while a frame arm can move the shorter hair across the side. Hold the wig by a sturdy part of the cap as you check those areas. If a wave has moved, support it near its base and follow its existing curve with your fingers. Work on the affected section to preserve the gaps between the other waves. Ask the stylist what they used on the short side before applying a touch-up product.
With frequent wear, inspect the lace and cap weekly for perspiration and residue. Set the wash interval according to actual wear, product buildup and the instructions for the fiber. When washing is due, support the lace and avoid rubbing the raised waves together. Blot excess moisture and dry the wig on a suitably sized stand with space around the temple. If you use adhesive, follow the compatible remover’s directions before cleaning the underside. A wash can shift the way the crests sit, so let the wig dry fully before deciding which areas need resetting.
If you buy a colored human-hair version, ask the colorist which products suit its treatment history and which method they recommend for resetting the broad waves. With synthetic fiber, follow the maker’s temperature and product limits. Check the instructions before using a heated tool or steam. If the wine shade looks dull, view the dry wig in indirect daylight. Residue can collect along the broad ridges, and a flattened crest can reflect less light even when the color itself looks the same. A stylist can assess both when several waves lose their depth.
Save a front view and an eye-level profile after your first fitting. On the side photo, make sure you can see the long curve and where the shorter accent sits. That record helps when booking a reset after washing or extended wear. Between uses, place the wig on a stand that supports the cap, leaves the temple free and gives the tallest waves clearance. For travel, carry it in a firm case, with light support inside the cap and room for the lace to lie unfolded. Check the fit and the side detail when you unpack.
Test the Pixie on an Ordinary Day
The short sides leave the neckline clear, and the red catches the eye when you turn. That combination works for a wearer who wants color and height without hair touching the shoulders. Try the wig with the accessories you use most and check how much of the red appears under your usual lighting. For everyday wear, it helps to know whether the lace can settle comfortably at the same point and how much of the side design remains visible when you put on your glasses or headphones.
The main trade-off is maintaining the high waves and the close side at the same time. Pressure from tight headwear can flatten the crests, while friction near the temple can blur the curve. The fixed wave direction also limits how easily you can restyle the front. Before leaving the fitting, remove and replace the wig yourself, then check the first burgundy bend and the lowest point of the side line. Those two spots will show whether the fit is easy to reproduce and whether you can keep the details you chose without daily salon work.
Search Terms
wine red pixie wig with dark taper · burgundy S wave short wig · black rooted burgundy curl crown · side sweep pixie with curved temple line · short wine red lace wig with raised waves · cherry burgundy pixie with close sides · sculpted red waves with dark hairline · burgundy pixie with curved side accent