
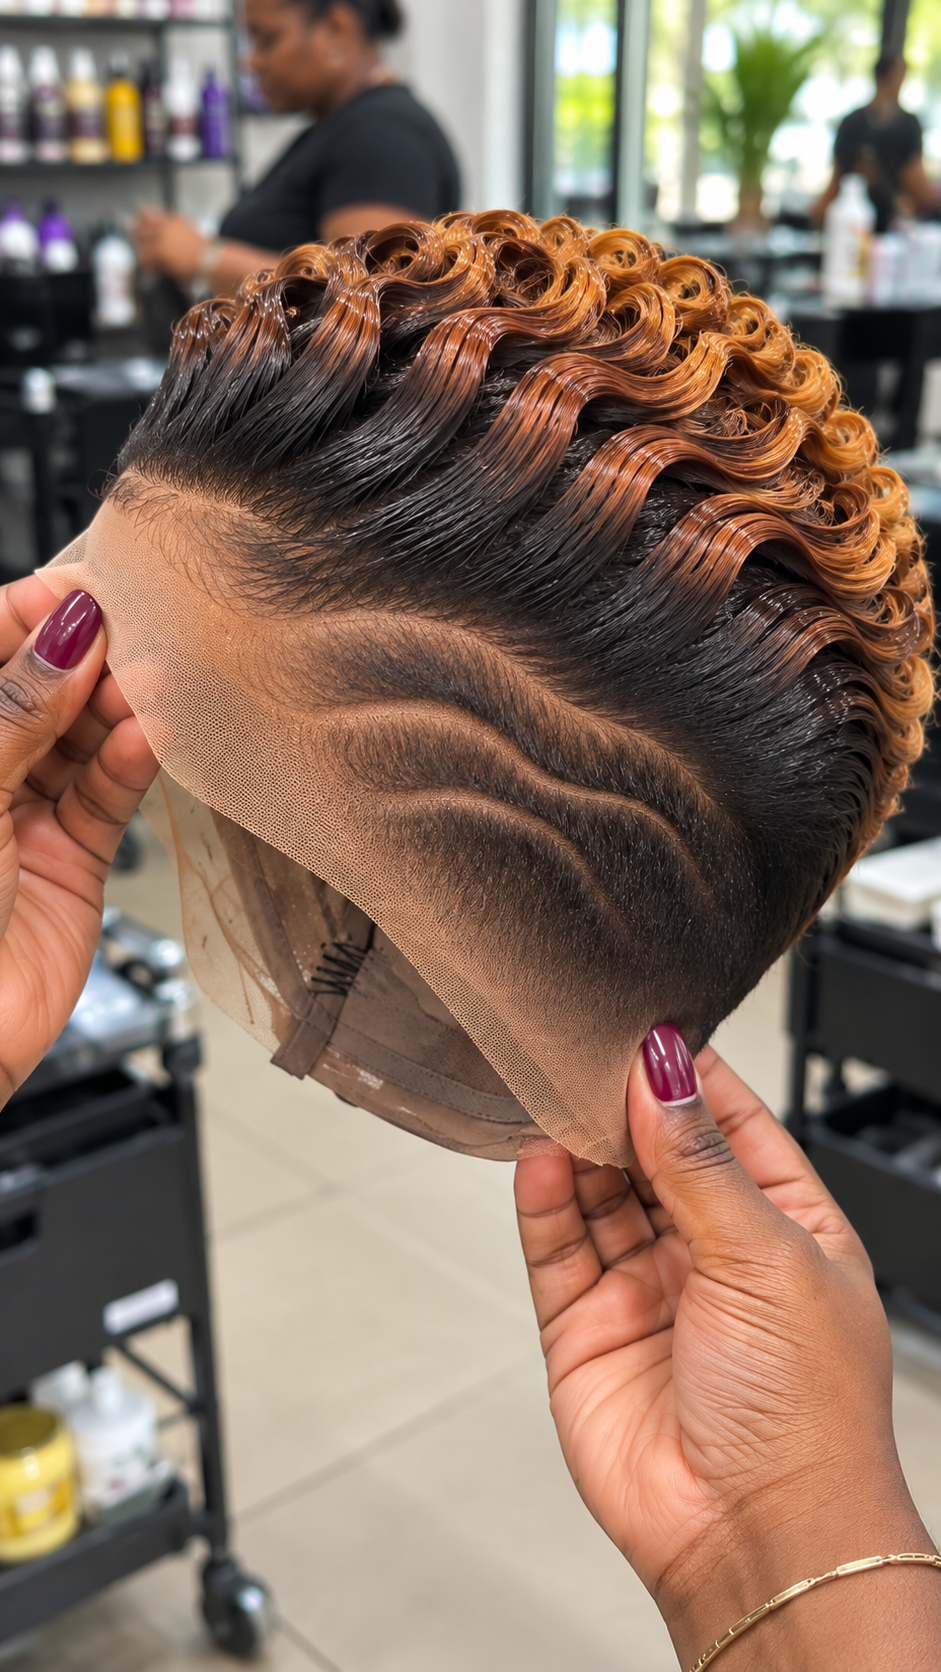
Copper comes into view just where the waves begin to rise on this short wig. The hair starts dark at the front and along the visible side, then turns through warm brown into bright copper across the crests. Each section sweeps back in a broad S before folding into a smaller curl toward the crown. From the side, the warm color appears in repeated bands, with dark valleys between them.
Below those raised waves, three curved lines run through a closely cropped-looking panel. They follow a similar path but end at different points, leaving narrow strips of dark hair between them. The curves give the side the look of a patterned taper, and their smaller scale makes the crown seem taller. Because the panel stays dark, the copper remains concentrated where the hair lifts away from the head.
Two hands hold the copper wave pixie wig open, revealing tan lace beyond the hairline and a small comb inside the cap. The photograph gives a clear view of one temple and much of the crown. If you are taking it to a wig maker, show them where the copper begins on the first wave and trace the lowest side curve. Those points are easier to agree on before the hair is set and the lace is fitted.
Where the Copper Begins
The front reads dark before the color changes along the first bend. Farther back, the warm sections become more noticeable, with brighter orange-gold tones around some of the smaller turns. The transition varies slightly from wave to wave. That variation keeps the highlighted sections from looking like a straight stripe across the top. For a custom version, discuss the height of the color change in relation to the curve itself. Copper that begins higher up will leave more dark hair visible from the front. Copper that starts closer to the hairline will show sooner when you look straight ahead.
Shade names can be a starting point when you order by message. To make the choice more precise, ask to see the proposed color beside the dark base under the same light. If you can visit in person, hold the sample near your face by a window and look at it under the salon’s regular lights as well. When buying remotely, request a slow video turn in indirect daylight. Watch the copper as it moves out of the brightest reflection. That will help you tell whether you prefer a redder copper, the golden cast seen on the upper turns here or a deeper brown transition.
A styled sample can answer questions that a flat swatch leaves open. On a wave, some of the copper faces outward while another portion folds into shadow. If you want the brightest part to sit on the crest, ask the maker to show you a sample section in roughly the curve you intend to wear. Confirm how the color will be produced on the chosen fiber and what happens if the sample needs adjusting. A precolored unit, a blended synthetic piece and a custom-colored human-hair base can give different results even when their swatches look close together.
Three Curves Need Enough Space to Read
The side pattern works because each exposed line has dark hair on both sides. The upper line runs nearest the longer hair, while the shorter curves nest beneath it. When you look at the whole panel, the width of the dark bands is as noticeable as the lines themselves. If the available area is smaller once the cap is fitted, ask the maker to show how the design would change. A slight adjustment to the length of the lower curve may preserve more separation than pressing all three lines into a narrow space.
Place the wig where it will sit during wear before you judge the side. Check the upper line against your brow and the lower curve against the area just above your ear. Bring your usual glasses if you wear them. The arm of a frame can cover the end of a line or press short hairs across it. A few minutes looking straight ahead, turning toward a mirror and taking the glasses off again can show whether the pattern sits comfortably. This is also a good time to ask for a profile photo, since a hand-held view exaggerates some angles and hides others.
For a custom wig, clarify what the lines will look like close up. A maker may create exposed channels in a lace panel or use a different construction to give the appearance of a closely clipped design. Ask to see a completed example from the same distance as the reference, along with a photograph taken at normal viewing distance. The close view shows the edges and the visible base. The wider view tells you whether the curves remain distinct once you are looking at the whole hairstyle. Discuss the finish on the opposite side and at the nape separately.
Find Out Where To Buy This
Look for a custom wig studio, a beauty supply boutique with pre-styled short units or a wig stylist who shows molded S waves and patterned temples in their portfolio. A shop may have a dark-rooted copper pixie with a suitable wave set. A custom maker can discuss the spacing of the side design and the point where each wave changes color. Send the reference when you enquire and ask for examples taken from the featured side. A straight-on photo can show the right shade while telling you very little about the shape around the ear.
In your order message, state which side you want the curves on from your own perspective. Mark the photo if you are also sending a mirrored selfie. Include the maker’s requested measurements, your preferred crown height and any areas you want to keep clear of glasses or earrings. Describe the color in relation to the set by asking for a dark front and copper on the raised turns. If the longer waves and the smaller crown curls are both important to you, point to one example of each so the maker can show how they plan to connect them.
Before paying, request a front view, both profiles, a rear view and a photograph of the complete interior. Confirm the hair fiber, lace shade, measurements, adjustment hardware and whether the lace comes trimmed. If the unit is ready to sell, ask for a video of that piece. For a custom order, agree on a date for approving the color and side pattern, then ask which alterations are included. Get the price of delivery and the return or alteration terms in writing, particularly if a seller proposes trimming the lace before you can try it on.
To book a local appointment, look for a stylist who fits lace wigs and has experience setting short waves. Tell the salon whether you are bringing a finished unit or a base that needs cutting, color and styling. Ask whether the wig needs to be dropped off before the fitting. For a version on your own hair, a short-hair stylist and a barber can assess the wave length and side design together. Show them the profile first so they can agree on where the short panel should end and how much hair needs to remain above it for the raised waves.
Choosing Lace Coverage and Checking the Fit
The lace in the photograph extends around the front and patterned side. Ask the seller for the dimensions of the usable area, since the visible flap alone gives little information about how far the styling area extends inside the cap. A lace-front unit can suit a similar design if the usable lace reaches the featured temple and supports the lowest curve. A frontal can give the maker more working room around that side, depending on its width and depth. Ask them to mark where the curves would sit on the proposed cap, including the position of any seam near the shortest hairs.
A closure may suit a version with a fixed front and a simpler side, provided the maker has a way to hold the temple pattern in the intended position. Ask for a photo of a similar closure build if you want all three lines. Full lace gives a maker more freedom to plan where the visible design falls, particularly if it will extend farther around the head. The value of that flexibility depends on your brief. If you expect to keep the same wave direction and wear one featured side, inspect how well the proposed cap handles that area and how comfortably its edge sits.
The visible comb is one attachment component. For a glueless fitting, check the complete arrangement, including any elastic band and adjustable straps. Follow the seller’s measuring instructions and supply ear-to-ear and front-to-nape measurements if requested. With the wig in place, look down and turn your head. Check whether the short side moves toward your ear or whether a comb presses while you put your glasses on. If something shifts, ask the stylist to adjust the cap before changing the side pattern. That lets you assess the design once the fit is settled.
An adhesive installation can give a compatible lace unit extra hold along the edge. Agree on placement with the installer and compare the lace shade against your skin near both the forehead and the exposed lines. Ask which removal product goes with the adhesive and have the stylist demonstrate how to release the edge gently. Mention whether you normally take your wig off every evening or prefer longer intervals between fittings. Frequent removal puts more handling around the shortest hairs, and the method should suit the routine you can maintain.
Keep Enough Length for the Deep Bends
The large waves need enough strand length to leave the dark base, rise into the copper crest and turn back. Ask for the listed hair length and a profile of the finished height. Two wigs with the same advertised length can sit quite differently if one set leans back and the other rises above the forehead. If you want a lower silhouette, ask the stylist whether the first few waves can tilt toward the crown while keeping their width. Review the side after that adjustment to see how much copper is still visible.
Ask about density by area. The crown needs enough hair to form the broad, continuous surface of each wave, while the valleys need space to remain visible. Additional hair near the base can fill those spaces and hide some of the dark transition. The temple needs a closer distribution so the three lines remain separate. If you want more fullness, ask the maker to show where it would go. A little extra volume behind the first wave can change the profile without making the narrow side bands heavier.
Comparing Prices for the Wig and Side Work
The five tiers below are illustrative USD budgeting ranges. Actual quotes vary with the fiber, color work, cap construction, customization, supplier and location. Shipping, installation and a later reset may be separate. Ask whether a quoted unit includes the raised copper waves and the three-curve side, especially when a retailer supplies the wig and a local stylist completes the finish.
| Tier | Illustrative Price Range | Potential Scope |
|---|---|---|
| Budget | USD 20–50 | Ready-made synthetic short wig with a fixed warm color blend and a simple temple. |
| Value | USD 50–120 | Pre-styled synthetic pixie with darker roots and larger waves or a more visible side accent. |
| Mid | USD 100–205 | Short human-hair base, with custom color and styling potentially quoted separately. |
| Premium | USD 185–350 | Custom set on a standard cap, with specified copper placement and a planned temple finish. |
| Salon-Grade | USD 350–675+ | Made-to-measure unit with tailored lace coverage, individually arranged waves and side lines checked during fitting. |
Ask for a quote that lists the base, color and side work separately. A ready-made piece that already has the right shade and wave depth might only need fitting and a modest adjustment. If the curves are central to your choice, ask the installer to assess the proposed base before you buy it. A second appointment may be needed if the wave set and side fitting happen at different stages. Include that time and cost when comparing it with an order that arrives fully styled. Ask who can redo the waves after a wash and what that service covers.
Care for the Raised Waves and the Close Side
After each wear, look at the first copper crest and the lowest exposed curve. The crest can flatten under a scarf or hat, while the temple can shift where it touches a glasses arm. Hold the wig by a sturdy part of the cap when removing or inspecting it. If one section has moved, use your fingers to follow the original bend and settle the surrounding hair gently. Working on one area preserves the spacing elsewhere. Ask the stylist what they used at the temple before adding product, since buildup can collect between the short dark bands.
For regular wear, inspect the lace and inside of the cap weekly for perspiration and residue. Follow the fiber’s care instructions and use the amount of wear and buildup to decide when to wash. Support the lace during cleaning, avoid rubbing across the patterned side, and blot excess water gently before drying the unit on a stand. Give the copper waves room to dry without pressure. If you use adhesive, follow the compatible remover’s directions before cleaning residue from the underside. Once the wig has dried, check the side against your fitting photo before reshaping any of the short hairs.
For colored human hair, ask the maker which products suit its processing history and what method they recommend for restoring the set. Synthetic fibers have their own temperature limits, so check the manufacturer’s instructions before using steam or a heated tool. If the copper seems dull after cleaning, look at the dry wig in indirect daylight before reaching for a color treatment. A change in shine can come from residue or from the way the wave now faces the light. A stylist can assess the finish when several crests lose their shape or the bare lines begin to disappear beneath loose strands.
Store the piece on a stand that supports the cap without stretching the edge. Leave clearance beside the patterned temple and above the tallest wave. Keep it out of prolonged direct sun, and use a firm case for transport so the lid stays clear of the crown. If you are taking the wig to an event, unpack it with enough time to look at the profile in a mirror. The top may still look intact even if one of the fine side lines has been compressed. Keep a front photo and a profile from the first fitting for any later reset.
Trying the Pixie With Your Usual Accessories
The short shape leaves the neckline open, and the darker base lets the copper show in sections as you turn your head. The side design gives you a distinct profile while the raised waves provide color and lift from the front. For regular wear, try the wig with the frames, earrings or head covering you use most. Check whether the upper wave clears the fabric and how much of the pattern remains visible beside the ear. If you wear it mainly for occasions, look at the shade under lighting similar to the room where you expect to be.
The trade-off is that the crown and temple take different kinds of care. The wide waves need room to hold their shape, while the exposed curves depend on the cap landing consistently. A fixed side design also limits how far you can redirect the hair. During the fitting, take the wig off and put it back on yourself, then look at the lower curve and the first bright crest. If those details return to the positions you chose and the cap feels comfortable with your usual accessories, you can judge how much work this style will take on an ordinary morning.
Search Terms
copper wave pixie wig with curved temple lines · dark root copper S wave wig · short black and copper sculpted pixie · copper curl crown with patterned side · copper tipped waves on short lace wig · three curved side accents pixie · swept back copper waves with dark temple · short copper pixie with cropped side design