
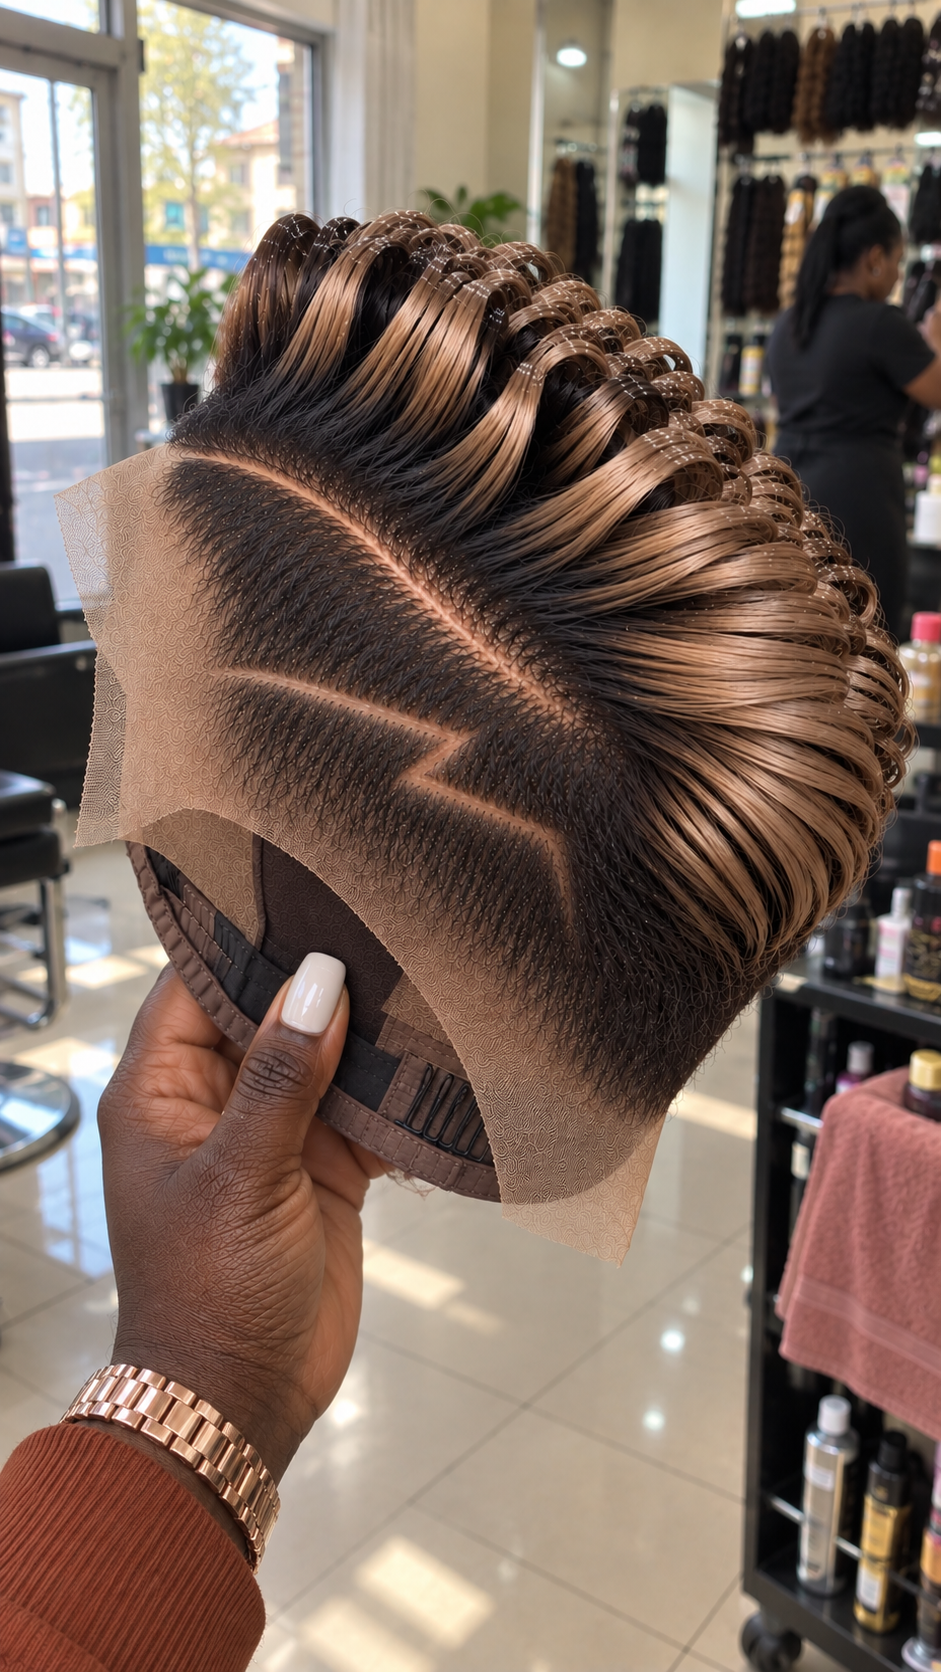
This mocha beige loop pixie wig combines a deep espresso-black foundation with warm beige-brown highlights arranged through a sculpted crown of large backward loops. The close side construction adds a striking contrast, while two intersecting shaved-style lines create a distinctive geometric detail near the temple.
The color placement is one of the most noticeable parts of this design. Instead of covering the entire crown in a lighter shade, mocha and beige tones travel across selected outer sections while the roots and lower layers remain dark. The result is a dimensional two-tone appearance with plenty of depth between every loop.
Mirror-like glossy hair, silky reflective finish, healthy wet-look shine, individually visible strands, ultra-defined texture.
Deep Espresso Roots Build the Foundation
The base begins with a very dark espresso-brown to natural-black shade. This color remains dominant around the roots, sides and lower crown, providing the visual foundation for the lighter sections above.
Keeping this depth at the root is important because it separates the individual loops. Without the darker foundation, the beige-brown sections could blend together and lose much of their sculpted appearance.
When requesting a similar custom unit, ask for deep espresso roots with controlled mocha-beige highlighting rather than an evenly colored brown wig.
Mocha Beige Highlights Follow the Loops
The lighter color is a warm combination of mocha, taupe brown and muted beige. It is softer than caramel and considerably deeper than champagne blonde.
The highlights are concentrated along the exposed surfaces of the larger loops. Dark strands remain visible underneath, producing a layered color effect whenever the crown catches the light.
This placement also allows the color transition to follow the movement of the hairstyle instead of appearing as conventional straight highlights.
The Crown Uses Large Backward Loops
The upper structure consists of broad, elongated loops that rise from the root and curve toward the back. These are larger than traditional finger coils and more controlled than loose curls.
Each loop maintains a clearly visible arch. The sections are positioned close together, creating substantial crown coverage without hiding the individual pattern.
The overall direction remains consistent from front to back, which gives the wig its sculpted appearance.
Front Sections Carry Extra Height
The loops near the front stand slightly taller before bending backward. This creates elevation above the frontal area and establishes the shape of the entire crown.
Moving toward the rear, the loops gradually become lower and more compact. The transition prevents the wig from appearing equally tall across the entire head.
This progressive reduction in height is worth mentioning when commissioning a custom version because it affects the final silhouette considerably.
The Dark Interior Adds Visual Depth
Many of the lighter loops retain a dark interior. This detail makes each arch appear deeper and more dimensional, particularly under bright salon lighting.
The contrast also makes the mocha-beige outer surfaces look brighter without requiring an extremely pale blonde color.
For the closest result, the lighter shade should not completely replace the dark base.
The Side Is Kept Extremely Close
The temple and lower side areas use a very close dark foundation. Fine strands follow the contour of the unit and gradually transition into the longer crown.
This compact area creates enough open visual space for the decorative line work while emphasizing the volume above.
The dark side also connects naturally with the espresso root color running beneath the highlighted crown.
Intersecting Lines Create the Signature Side Detail
Unlike a simple parallel-line design, this unit uses two sweeping channels that intersect near the center of the side. One line travels diagonally through the temple area while another crosses its path before continuing toward the rear.
The intersection gives the design a sharper geometric character while still following the natural curvature of the wig.
This detail should be shown to the stylist from a clear side or three-quarter reference because the crossing point is important to the overall appearance.
The Upper Channel Extends Across the Temple
The longest channel begins toward the front and travels diagonally backward through the dark side foundation. Its width remains relatively consistent through most of the design.
The surrounding dark strands make the exposed line highly visible without requiring additional color.
Accurate placement matters because positioning the line too high can interfere visually with the crown transition.
The Second Line Adds a Geometric Accent
A second channel approaches from a different angle and crosses the primary line. The intersection creates a subtle X-like section without turning the entire side into a complicated pattern.
The remainder of the side stays comparatively simple, allowing the crossing lines to remain the focal detail.
If ordering remotely, send a high-resolution side reference and specifically mention that the lines must intersect rather than remain parallel.
The Crown and Side Remain Visually Connected
Although the top and side use dramatically different lengths, the dark root zone creates continuity between them. Longer crown strands emerge gradually from the compact foundation instead of beginning with an abrupt boundary.
This transitional area is especially visible beneath the mocha-beige loops.
Preserving it helps the finished wig appear intentionally constructed rather than assembled from unrelated sections.
Extended Lace Allows Final Positioning
The wig is shown before final lace trimming, with excess lace extending around the frontal and side perimeter. This gives the installer room to position the unit before making permanent cuts.
Correct placement is especially important for this design because the temple pattern needs to sit at the intended angle once the wig is worn.
The lace should therefore be aligned and checked from several angles before trimming.
A Fine Lace Perimeter Works Best
Close-sided pixie wigs expose more of the perimeter than long wigs. For that reason, lace quality can have a noticeable effect on the final installation.
Fine lace that suits the wearer’s skin tone can help reduce the visible transition around the frontal and temple areas.
Ask the seller for detailed photographs of the lace, knots and side construction whenever possible.
Cap Fit Is Particularly Important
A loose cap can shift the intersecting side design away from its intended temple position. A cap that is too tight can also distort the perimeter and make installation difficult.
For custom orders, measurements commonly include head circumference, front-to-nape distance and ear-to-ear measurements.
A correctly sized cap becomes even more useful if the unit is intended for regular glueless wear.
Human Hair Offers Greater Customization
A human-hair version is a strong choice for buyers who want greater control over color, loop placement and future restyling.
The mocha-beige sections can be customized more precisely, and individual loops can be reset after washing when necessary.
Because highlighting requires chemical processing, choose good-quality hair if maintaining shine and flexibility is a priority.
Synthetic Versions Can Retain the Loops Longer
Premium synthetic fibers can offer strong shape retention for a highly structured crown like this one. The loops may require less frequent resetting than comparable human-hair sections.
This can make synthetic versions attractive for wearers who prefer minimal styling.
However, recoloring options are limited, and heat should only be used when the manufacturer specifically identifies the fiber as heat resistant.
Glueless Construction Makes Daily Wear Easier
A fitted cap with adjustable straps, combs or an internal elastic band may allow this design to be worn as a glueless pixie wig.
This can make removal and storage easier while reducing the need for adhesive during everyday wear.
Because construction varies between sellers, confirm the internal cap features before ordering.
Where to Get This Wig Made
Search for a custom pixie wig stylist, lace wig specialist or wig maker experienced with sculpted loop crowns. The stylist should be comfortable working with close side foundations as well as dimensional color placement.
For the intersecting side channels, experience with barber-inspired detailing is particularly useful.
If one stylist does not provide every service, the wig can potentially be constructed and colored by a wig specialist before the precision side work is completed by someone experienced with this type of detailing.
What to Tell the Stylist
Describe the unit as a deep espresso-root pixie with broad backward loops, mocha-beige highlighting and an extremely close dark side.
Specify that the lighter color should follow selected loops rather than covering the entire crown.
Most importantly, explain that the side requires two intersecting curved channels instead of ordinary parallel lines.
How to Book an Appointment
When contacting a salon or custom wig maker, send clear front, side and crown references. Ask whether they can reproduce the color placement and loop structure before paying a deposit.
Confirm whether the appointment includes lace customization, coloring, loop setting, side detailing and installation.
If the unit is being made remotely, provide accurate head measurements and ask how much customization can be completed before shipping.
Where to Buy a Similar Wig
Look through custom wig boutiques, independent wig makers and specialty online stores offering two-tone pixie lace wigs. Search specifically for units with sculpted crowns because a conventional curly pixie will produce a noticeably different result.
Product photographs should ideally show the crown, side and lace perimeter rather than only a frontal model image.
Compare the actual loop size, root color, highlight placement and side construction before ordering.
How to Order the Closest Match
Start by requesting a natural-black or deep espresso base. Add warm mocha-beige highlights through selected upper sections while keeping substantial dark root depth.
Request large backward loop sections across the crown, with slightly greater elevation toward the front and a gradual reduction toward the rear.
For the side, specify an extremely close dark foundation with two intersecting curved lines. Confirm lace shade, cap measurements and glueless construction options before production begins.
How Much It Costs
| Wig Type | Estimated Price | Typical Details |
|---|---|---|
| Premium Custom | $500–$950+ | Premium human hair, custom mocha-beige color, fine lace, fitted cap, hand-formed loops and precision intersecting side lines |
| Standard Custom | $290–$550 | Human hair, dark roots, dimensional highlighting, customized lace and sculpted loop crown |
| Basic Human Hair | $165–$325 | Human-hair pixie base with simpler highlighting and reduced custom detailing |
| Premium Synthetic | $85–$180 | Higher-grade synthetic fiber, preset crown structure, dark roots and lace-front construction |
| Basic Synthetic | $45–$95 | Factory-made pixie unit with basic two-tone coloring and simpler crown styling |
The final price can vary according to hair quality, density, lace type, cap construction and the amount of hand styling required. Custom color placement and individually formed crown loops generally increase the price compared with a standard factory-made pixie.
Maintaining the Sculpted Crown
Avoid running a brush directly through the loops. Doing so can separate the carefully arranged arches and change the structure into loose waves.
Instead, use the fingers to reposition individual sections while following their original backward direction.
If a loop loses its shape, a stylist familiar with sculpted pixie wigs can reset the section without disturbing the rest of the crown.
Protecting the Mocha Beige Color
For human-hair versions, use products intended for color-treated hair and avoid unnecessary exposure to excessive heat.
The highlighted strands have typically undergone more processing than the dark base and may require additional conditioning.
Professional toning can help restore the intended muted beige-brown appearance if the lighter sections become excessively warm over time.
Keeping the Side Pattern Visible
Avoid applying heavy oils or thick styling products directly over the close side area. Product buildup can cause the fine strands to group together and partially obscure the intersecting channels.
Handle the lace gently around this area during installation and removal.
The side detail is one of the defining elements of the wig, so maintaining its contrast is just as important as preserving the crown loops.
Storage Protects the Shape
Place the wig on a supportive stand when it is not being worn. Make sure the crown has enough clearance so the loops are not compressed against surrounding objects.
For travel, use a container large enough to protect both the lace perimeter and upper structure.
Never store the unit while damp, particularly if it is made from human hair.
A Distinctive Two-Tone Pixie Design
The strongest elements of this wig are its deep espresso roots, warm mocha-beige loop highlights, sculpted backward crown and intersecting side-line detail. Together, these features create a highly recognizable pixie design without relying on extremely bright color.
For the closest recreation, prioritize the shape of the loops and the placement of the side channels as much as the color itself. Those details are what separate this unit from an ordinary highlighted curly pixie wig.
Search Terms
mocha beige loop pixie wig · espresso root highlighted pixie lace wig · brown loop wig with intersecting side lines · mocha pixie wig with shaved line design · dark root beige glueless pixie wig · two tone loop crown lace wig · brown highlighted pixie wig with curved lines · espresso mocha sculpted pixie wig