
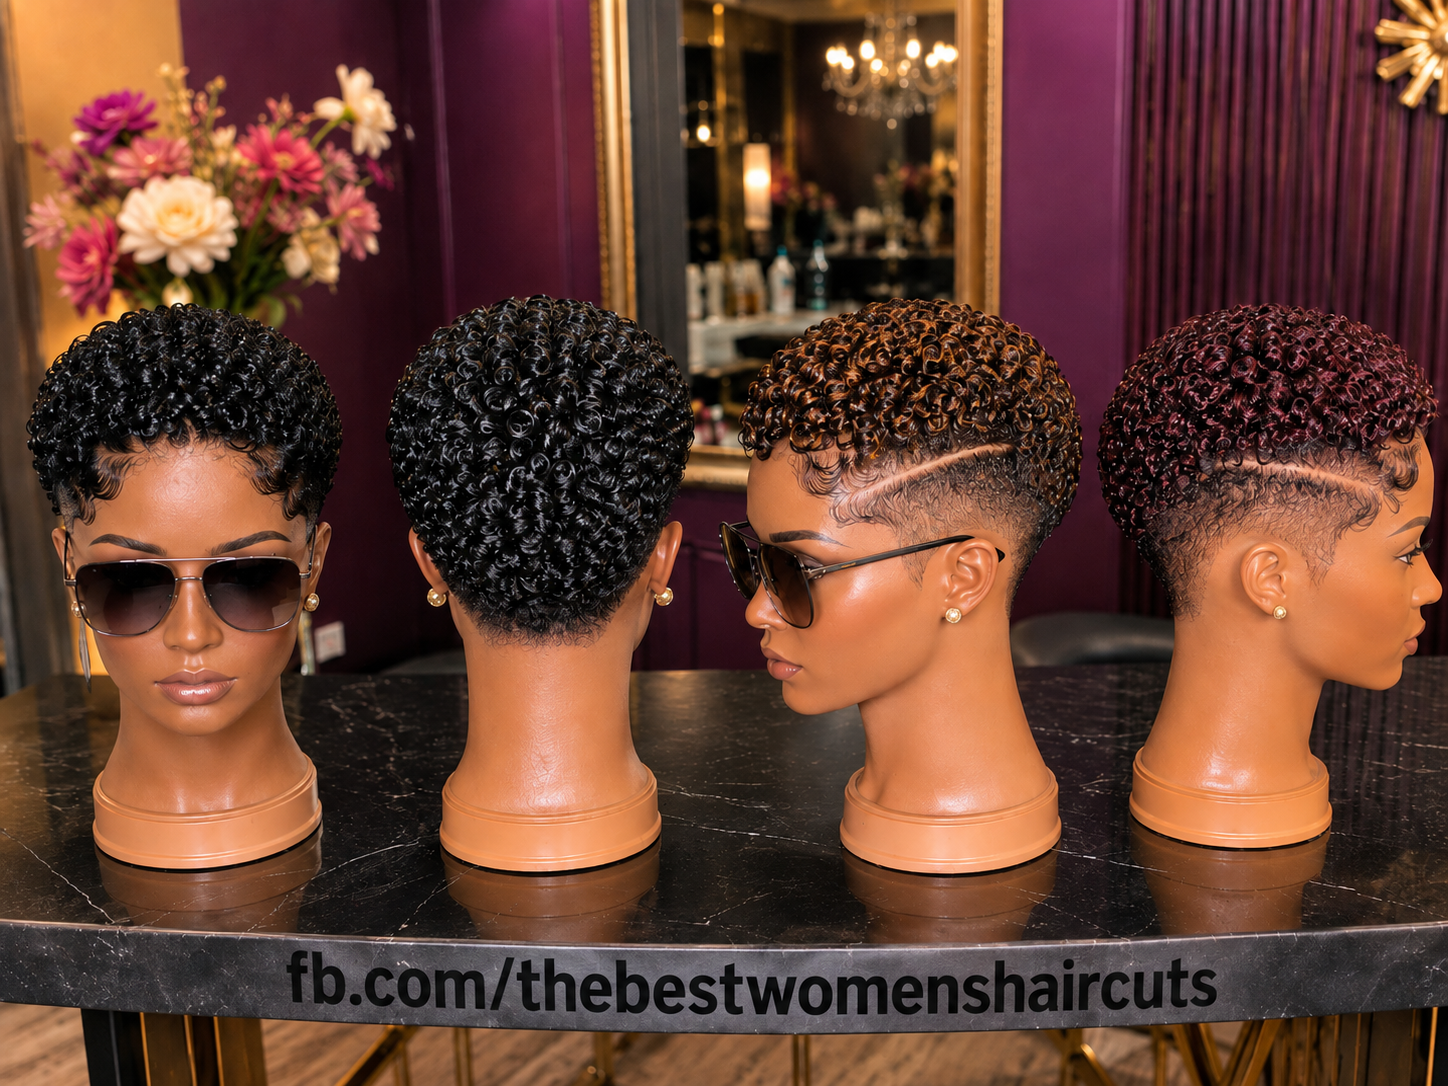
One polished front photo can sell almost any short wig. A carefully chosen camera angle can hide a weak nape, an uneven fade, a bulky side, or a crown that only looks balanced from one direction. That is why a display like this is much more useful than a normal beauty shot.
Here, the same general short curly pixie concept is shown from the front, back, left side, and right side. The colours vary, but the important buying lesson is not the black, copper, or burgundy finish. It is the ability to inspect the silhouette from several directions at once.
For a short pixie, that matters enormously. There is very little length available to hide weak construction. If a seller only shows you one flattering angle, you still do not know what the wig actually looks like.
Where To Buy A Pixie Wig From Sellers Who Show Every Angle
Custom wig makers. Ask the maker to photograph or record the finished unit from the front, back, left side, and right side before shipping. This should be done with the wig sitting naturally rather than being repositioned for every photograph.
Instagram and TikTok sellers. Video is especially valuable here. Ask for one continuous rotation instead of four separate edited clips. A continuous turn makes it much harder to hide a weak area between camera angles.
Etsy. Independent makers may already show multiple views, but confirm that the photographs belong to the same unit. Different examples can hide inconsistencies in cut, density, colour, and side design.
Marketplaces like Amazon, AliExpress, and Temu. Product listings frequently recycle studio photographs. Customer videos and review photos may give you a more realistic idea of what the sides and back actually look like after delivery.
Local beauty supply shops and salons. Local buying gives you the strongest possible multi-angle inspection. Place the wig on a mannequin head and physically walk around it. Do not stand in front of it and judge the entire unit from one position.
Vendors and wholesalers direct. Ask for a 360-degree sample video of the actual style or batch you are ordering. If you are buying several units, ask whether the shape remains consistent between pieces.
Regionally. Sellers in Lagos, Accra, Atlanta, London, and major South African hair markets may use different names for the same pixie shape, so visual proof is more useful than terminology. Ask for the four basic views regardless of what the style is called.
Vet the seller. A seller willing to reveal the back and both sides is giving you much stronger evidence than one who repeatedly sends versions of the same front three-quarter photograph.
Red flags. Be cautious if the back is never shown, one side is always hidden, every photograph is heavily tilted, or different colour options appear to use different mannequin heads and completely different cuts.
When you order, send. Provide your cap size, preferred colour, reference style, and ask in writing for front, back, left, and right confirmation photos before dispatch if the order is custom.
Contact / order inquiries: WhatsApp [WhatsApp: +XX XXX XXX XX XX]
How Much It Costs
Premium custom human hair. A carefully built short curly human-hair pixie can commonly range from around $220–$430 depending on lace, hair quality, cap construction, density, colour, and detailed side work.
Standard custom human hair. Around $170–$300 can cover many good short units. At this level, multi-angle consistency may tell you more about workmanship than a small difference in advertised hair grade.
Basic human hair. Around $150–$230 may buy a simpler unit. Look especially carefully at the nape and opposite side because those are common places for finishing to become less refined.
Good synthetic. Around $60–$150 can provide a very convincing preset pixie. Because synthetic styles are often factory-set, compare several actual customer units to see whether the shape is reproduced consistently.
Basic synthetic. Around $25–$70 is common for budget versions. A flattering front can still look impressive at this price, so side and back inspection becomes even more important.
What the price may exclude. Custom cap sizing, lace tinting, knot work, carved side detailing, colour work, and professional fitting may all cost extra.
Shipping and duty. International delivery, customs, and local taxes can increase the final price significantly. Compare the landed total rather than only the listing price.
Ongoing costs. Short curls may need mousse, light curl refresh products, lace care, and occasional reshaping to maintain the same silhouette across all sides.
First-year total. Include colour maintenance if you choose copper or burgundy, plus any professional adjustment needed if the back or sides arrive less balanced than expected.
Cost per wear. A wig that looks strong from every direction usually gives better value than a cheaper unit that only looks good when photographed from one side.
What a very low price may signal. It may indicate generic cap construction, rougher finishing on less-visible areas, or a product designed to succeed in a catalogue photo rather than in everyday movement.
Deposit structure. Custom wig makers commonly request around 30–50% upfront and the remainder before shipping. For a custom order, request your final confirmation video before paying the last balance.
Shipping, Delivery, And What To Expect After Ordering
When the wig arrives, recreate the seller’s four-view test before cutting any lace. Take one photograph from straight in front, one from directly behind, and one from each side.
Do not tilt the wig to improve the pictures. Let it sit in the position in which it would actually be worn.
Compare your photos with the seller’s reference. This quickly reveals whether the curl crown, side silhouette, nape, and perimeter correspond to what you purchased.
The Front Is Usually The Easiest Angle To Make Look Good
Most wig marketing naturally prioritizes the front because that is where buyers look first.
The front contains the face-framing curls, visible hairline, parting if present, and the strongest styling details. It is also the easiest area for a stylist to arrange carefully before taking a photograph.
That is why a beautiful front is necessary but not sufficient evidence of a good pixie.
The real test begins when you move away from the hero angle.
The Back Tests Crown Distribution
The rear view in a collection like this shows something the front cannot: whether the curl coverage continues evenly through the crown and down toward the nape.
A pixie can look dense from the front while becoming unexpectedly sparse at the back. Another may have beautiful side curls but form a heavy lump at the rear because too much hair was concentrated in one area.
From behind, the crown should look deliberately shaped rather than like the stylist stopped working once the front became attractive.
Pay attention to whether the curls gradually become shorter toward the lower back instead of ending abruptly.
The Side View Tests The Actual Haircut
A front photograph shows styling. A true side photograph shows structure.
From the side, you can judge where the crown begins, how high the fade reaches, how the temple area is shaped, how the ear opening would work, and whether any carved design sits in the correct place.
This is where short pixie wigs are especially unforgiving.
If the side silhouette is weak, no amount of beautiful curl definition at the front can completely rescue it.
The Opposite Side Matters Just As Much
Many buyers ask for “a side photo” and stop there.
That is not enough.
An asymmetrical pixie may intentionally have different styling on each side, but both sides still need to look finished. One may carry a deeper part or stronger carved pattern while the other remains cleaner.
If the seller always shows only the decorative side, ask for the plain side too.
A strong unit should not have a hidden side that looks unfinished.
One Continuous Rotation Is Better Than Four Perfect Photos
Separate photos can still be manipulated individually.
The wig can be tilted differently, curls can be moved between shots, lighting can change, and the photographer can select the most flattering frame for each angle.
A continuous rotation removes much of that advantage.
Ask the seller to place the unit on a mannequin and slowly turn it through a full circle without stopping to restyle it.
You are looking for consistency as the angle changes.
The Silhouette Should Not Collapse Between Angles
A well-designed pixie has a recognizable overall shape.
It may look fuller from the front, narrower at the temples, and more rounded from the back, but those views should still feel like the same haircut.
If one side suddenly looks extremely flat while the other is huge, or the back appears several centimeters taller than the front with no intentional design reason, the silhouette may be poorly balanced.
The strongest wigs change naturally with perspective without appearing to become completely different styles.
Multi-Angle Photos Reveal Whether The Fade Travels Correctly
The copper and burgundy units in this display make the faded side particularly easy to inspect.
A fade does not exist at one point. It travels around the head from the temple toward the rear.
A single side photo shows only the beginning of that path. The back and opposite side tell you whether the taper remains coherent around the full perimeter.
This matters because a fade that looks perfect near the temple can become too heavy or too high farther back.
Carved Designs Need To Be Judged In Position
The side units here include visible carved details within the short faded areas.
Those designs are directional. Their appearance depends on where they sit relative to the temple, ear, and crown.
A three-quarter photo can make a line look beautifully placed even if it sits too far forward or backward in real wear.
A true side view gives a much more honest judgment.
The Nape Is Easy To Hide And Hard To Fix
Back views also expose the lower edge of the haircut.
If the nape is bulky, irregular, or too long, it can make the wig feel less like a short haircut and more like a cap with hair attached to it.
That is especially important with pixies because the nape is expected to finish cleanly.
Ask for the camera to remain at head level. A high camera angle can hide the lower back almost completely.
Different Colours Should Not Hide Different Construction
This display includes black, copper, and burgundy versions of a similar curl concept.
That is useful, but it can create another trap. Buyers may assume they are choosing only colour when the individual units actually use different crown heights, side shapes, or fade designs.
If you want the black shape in burgundy, confirm that the seller can reproduce the black unit’s construction in the burgundy colour.
Do not assume every colour option is mechanically identical.
The Back View Is Particularly Useful For Density
Density can be difficult to judge from the front because curls overlap toward the camera.
From behind, you can see how evenly the hair covers the crown.
Look for large holes, obvious cap visibility, or sections where the curl pattern suddenly becomes much thinner.
Also watch for the opposite problem: a back so dense that the curls pile into a round lump rather than following the head shape.
Four Views Help You Spot Camera Tricks
Camera height changes how a pixie looks.
A low angle can exaggerate crown height. A high angle can hide the nape. A three-quarter view can make the side look slimmer than it really is.
When you have front, back, and true side views, those tricks become easier to identify.
The goal is not to accuse every seller of manipulation. It is simply to gather enough information that one flattering photograph cannot control the entire buying decision.
Ask For Neutral Lighting Too
Multiple angles are most useful when the lighting remains similar.
If the front is photographed under bright light and the back is almost in shadow, you still cannot compare density, colour, or finish properly.
Ask for a simple rotation in normal indoor light or daylight.
That is particularly useful for glossy black curls and rich burgundy tones because strong studio lighting can exaggerate shine and definition.
Use The Four-View Test When Your Wig Arrives
This is an easy habit to keep for every future purchase.
Before trimming lace, applying adhesive, adding product, or altering the unit, photograph it in four directions.
Front. Check hairline, face framing, crown balance.
Back. Check crown coverage, nape, and rear taper.
Left side. Check temple, fade height, ear area, and side design.
Right side. Repeat the same checks and compare.
If something is wrong, you now have clear documentation before making the wig non-returnable.
Before You Pay
- Can you send one continuous video showing the front, back, left side, and right side of the actual wig?
- Are the different colour options built with the same crown height, density, and side proportions?
- Can you show the nape directly rather than only from a high camera angle?
- Does the opposite side look fully finished even if it is not the decorative side?
- Will my custom unit be photographed from all four views before the final balance is paid?
Trimming The Lace
Complete your four-angle inspection before cutting any lace.
Place the wig in its natural wearing position and verify that the front, sides, and back all align correctly at the same time. Do not move the cap for each angle just to make individual areas look better.
Once the unit passes that test, trim the lace gradually around the intended hairline.
If one side only looks correct when the wig is rotated away from its proper position, solve that fit or construction problem before trimming.
Search Terms
360 view curly pixie wig · front back side pixie wig · short curly pixie wig all angles · tapered pixie wig side and back view · curly pixie wig 360 video · black copper burgundy pixie wigs · shaved side curly pixie wig · short ringlet pixie wig back view
Final Thoughts
The strongest thing about this pixie display is not the number of colours. It is the number of viewpoints. Front, back, and side views reveal different parts of the haircut, and short wigs need all of them because there is almost no extra length available to hide weak construction.
Make multi-angle proof part of your buying routine. A seller does not need an expensive studio or complicated video. One slow turn of the mannequin can show you the crown, fade, nape, opposite side, and overall balance in seconds.
Do not buy the best photograph of a pixie wig. Buy the unit that still looks good after the camera walks all the way around it.