
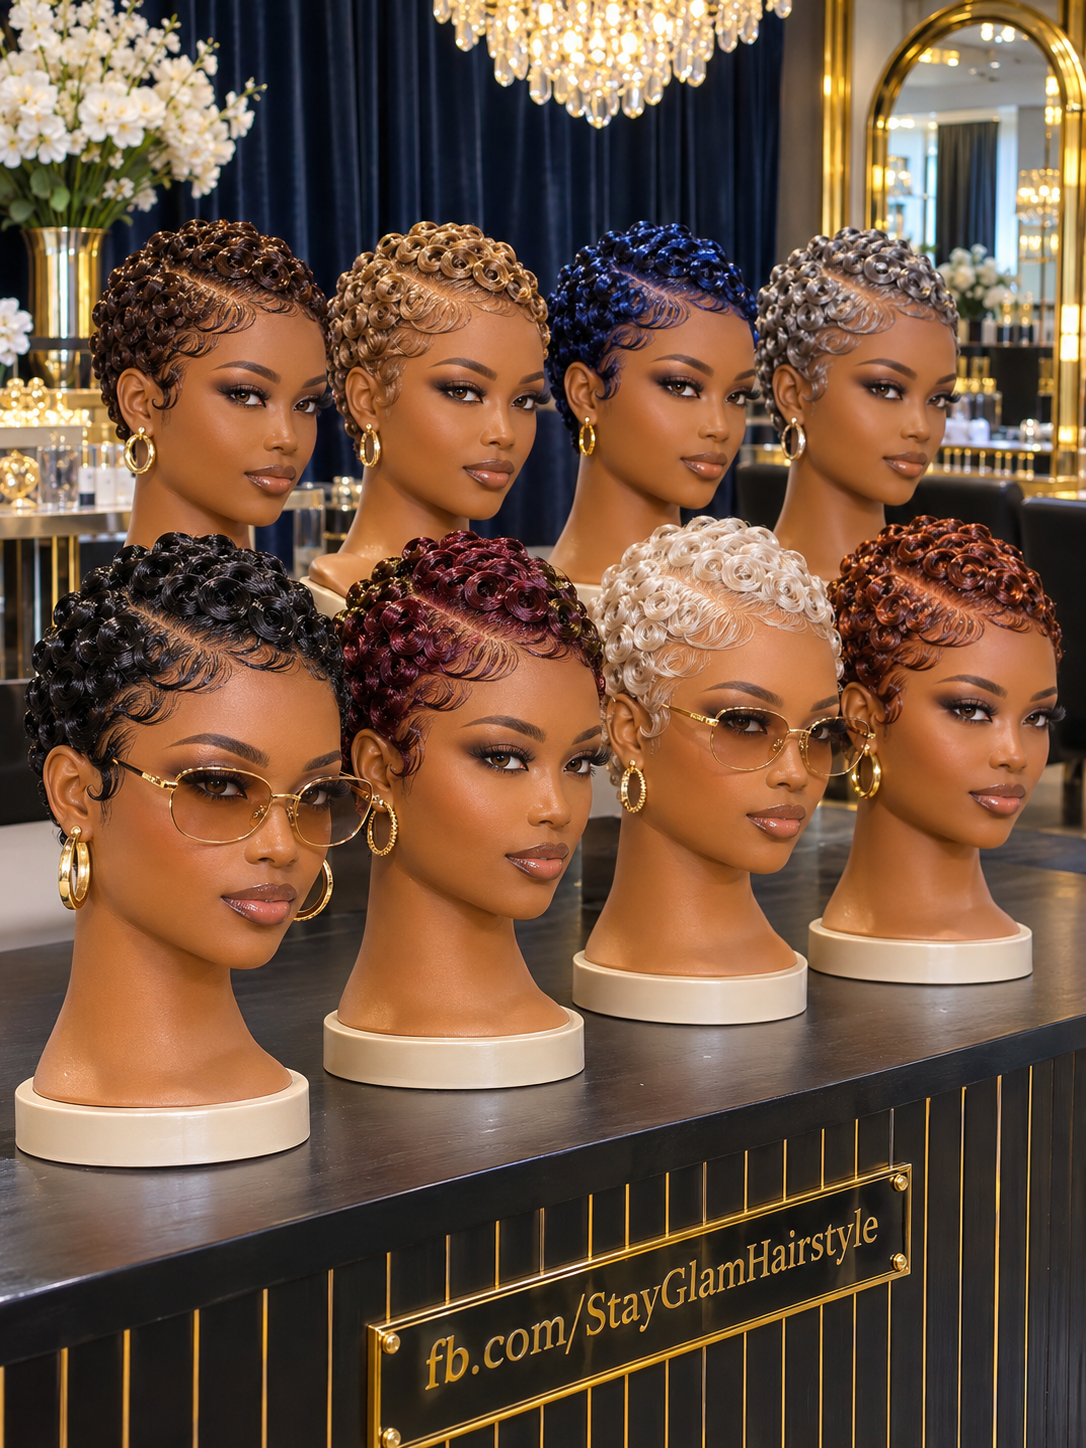
The prettiest detail in these short pixie wigs is the change in scale from crown to hairline. Rounded rosette curls sit close together across the top, with open centers that give each curl its own shape. Along the forehead, finer strands sweep into a row of scallops before curling down beside the ear. That contrast makes the cut feel dressed up even though the silhouette stays close to the head.
A diagonal side part separates the fuller crown from the low wave work at the front. It also gives the eye a clear path through a style with a lot of detail in a small space. On the black pixie, the part stands out against the dark hair. On the platinum version, shadows between the pale curls draw more attention, while the fine edges almost blend into the curls above them.
The mannequin display shows how far a single haircut can travel through color. Chocolate brown and honey blonde bring out the warmth in the curl ridges, burgundy and copper put more emphasis on the shine, and deep blue and silver gray make the same pattern feel cooler. Each version keeps the compact shape and a visible sweep at the temple, so the color changes the mood without taking over the haircut.
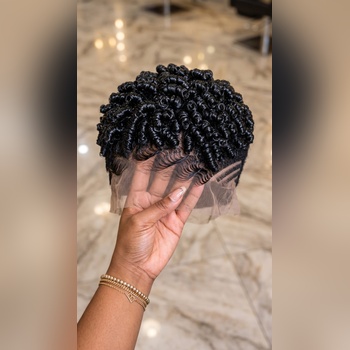
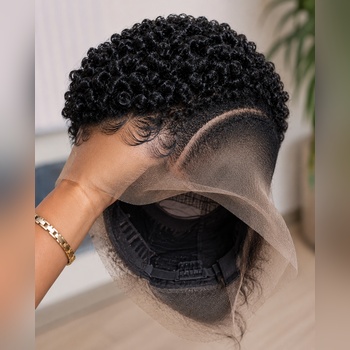
If you want to recreate this look, start by deciding which details matter most to you. Someone drawn to the crown may want larger rosettes with enough space to see the centers. Someone who loves the profile may want to spend more of the fitting on the part, the sideburn curl, and the way the hair sits around the ear. A good reference photo helps with both, and a few specific instructions give your stylist a clearer brief than the word pixie alone.
The Crown Shape That Gives the Pixie Its Character
The top is rounded, but the height comes from the individual curls. Each loop rolls back toward its center and rests close to the next, creating a raised pattern that still follows the head. You can see this particularly well on the pale blonde wig, where the inner curve of one rosette casts a soft shadow before the next begins. On the dark wigs, the same separation shows up through thin bands of reflected light.
Ask for a front and side reference when discussing how tall you want the crown. A few larger loops can give the top a softer, more open appearance. Smaller loops can pack more detail into the same area, although a very tight set will read differently from the wider rosettes in the display. The amount of space between curls matters too. Ask the stylist to show you a test curl if the design is being made from scratch, especially if you want a compact profile.
The curls close to the part help define its line. When a large loop overlaps the separation, the part can disappear from a normal viewing distance. A slightly smaller curl along that border gives the part room to show and lets the taller curls sit farther back. This is a useful adjustment for a petite cap or for anyone who wants the same pattern across a narrower crown.
How the Part and Temple Waves Frame the Face
The part starts high on one side and angles into the crown. Below it, broad curved sections lie flatter against the forehead than the rosettes above. Smaller curves fill the space between them, and the lowest curl finishes beside the ear. From the front, this creates a scalloped border. From the side, it pulls the eye down toward the cheekbone and gives the short cut a distinct profile.
Choose the side of the part before the hairline is trimmed or the crown is set. If you already part your hair on one side, try that placement first and see where the larger wave falls. Moving the part inward slightly can give a broad wave more room. Moving it closer to the temple can make the sweep feel more dramatic, provided the hairline still sits comfortably where you want it.
The black and platinum displays include glasses, which illustrate how visible the area around the ears is with this cut. Bring your everyday frames to a fitting. Put them on and remove them a few times with the wig in place to see whether the arms lift the edge, catch a curl, or press an ear tab. The same check is helpful if you regularly wear larger hoops. A small adjustment to the sideburn curl can leave more room without changing the overall pattern.
Choosing a Color That Shows Off the Curl Pattern
Black puts the emphasis on shape and shine. In the image, the brightest reflections follow the outer curve of each loop, while the darker interiors make the crown look fuller. Chocolate brown softens the contrast at the part and makes the waves at the forehead easy to follow. Both are worth considering if you want the same wig to work with understated weekday styling and dressier accessories.
Honey blonde gives the top a golden cast and lets the fine front waves show up clearly. Copper has a deeper reddish warmth, with brighter reflections along the bends and richer color inside the rolls. Burgundy looks darker in the recesses of the crown and more vivid where the curls catch the light. If you are deciding between copper and burgundy, look at the two shades near a window. The difference can be much more obvious in daylight than it is under warm salon lamps.
Platinum, silver gray, and deep blue each draw attention to a different part of the style. Platinum shows the outline of the rosettes clearly. Silver gray adds tonal contrast between the lighter bends and the darker spaces around them. Deep blue can look close to black in shadow and noticeably bluer where the curls reflect light. For a remote order, request an unfiltered daylight video and a close-up of the part. Ask whether the color at the hairline will match the crown, particularly if the maker is working with a blended shade.
Where To Buy This Wig
Look for comparable styles at beauty supply stores with short wig selections, specialist wig retailers, and custom studios that show their finished pixie work from several angles. A ready-made finger-wave pixie wig may have the close fit and waved front you want. For the raised rosettes, look closely at the crown photos or ask whether a stylist can reset the top. A listing labeled “short curly pixie” may show loose ringlets or a brushed curl pattern, so the product pictures are more useful than the label alone.
Send a custom maker the reference and explain which version you like. Specify the shade, the side of the part, how flat you want the temple waves, and whether the ears should stay clear. Include your measurements using the seller’s instructions and tell them whether you intend to wear the wig with adhesive or prefer a removable fit. If you have a second picture showing the back you want, send that separately. The front and three-quarter views in this display leave room to choose your own nape shape.
Before paying, request photos of the actual unit or a clear description of what the custom order includes. Useful views include the front in daylight, each temple, the nape, the top of the part, and the inside of the cap. Ask the seller to confirm the fiber, cap size, lace placement if applicable, and whether the waves arrive fully set. Check the total including shipping and any fitting or styling fee. For custom work, ask how color approval and adjustments work, when payment is due, and which changes are possible once production starts.
To book the style on your own hair, look for a salon that shows short cuts with finger waves and sculpted curls in its portfolio. Ask for a consultation and show the stylist both the crown and the temple details. They can assess whether your current length gives enough room to form the curls and whether a cut is needed to shape the sides. For a wig appointment, confirm whether the service includes a cap fitting, hairline customization, and curl setting. If you already own the unit, tell the salon what fiber it uses and bring any care instructions that came with it.
Which Cap Works With a Low, Side-Parted Pixie?
A lace-front cap can be useful when the front hairline and temple waves will stay exposed. Ask how far the lace extends and whether there is enough parting space for the diagonal line you want. A closure wig can work well with a fixed part if the closure sits where you need it. The area beside the closure may be constructed differently, so ask for a side view to see how the hair near the ear will be finished.
A frontal gives the stylist more room across the front when both temples need detailed shaping. The extra area can also make room for a deeper or more angled part, depending on the specific piece. Full lace is worth considering if you plan to change the part or restyle the unit regularly. If the crown and part will stay in one position, ask the maker which cap supports that design at your budget. A short, pre-styled synthetic cap may suit the same overall silhouette if the front already looks the way you want it.
Measure with your hair prepared as you expect to wear it under the wig. A thick braid or raised section beneath the cap can shift a pixie more visibly than a longer style because the crown follows the head so closely. Use the maker’s size chart and check any measurements they request beyond circumference, such as front to nape and ear to ear. During a fitting, look for even contact around the perimeter, ear tabs that sit level, and a nape that stays in place when you turn your head.
Fitting the Hairline With or Without Adhesive
A glueless fit can make sense for someone who likes to remove and store a sculpted wig after each wear. It depends on the cap and how it fits. Adjustable straps and an elastic band can help hold a compatible unit in place. Combs or clips may be available on some caps, although you can ask for other attachment options if they feel uncomfortable. Check the fit while looking down and turning side to side. A cap that shifts during those movements can pull the carefully positioned temple curls out of line.
Adhesive-based installation is an option for a compatible lace unit when you want the exposed perimeter secured. Ask your stylist what the installation includes and how the product should be removed. During either type of fitting, settle the placement of the cap before the final shaping of the forehead waves. If the unit moves forward or back after the curls have been styled, the arc over the forehead and the drop beside the ear may land in different places than you intended.
Matching Hair Density and Length to the Rosettes
Density affects how easily the separate curls can be seen. A very dense top can fill the gaps between loops and make the pixie look puffier than the display. Too little coverage can leave wider spaces between sections than you wanted. Ask for enough fullness to support the round crown, with a flatter distribution around the part and temples. Use a side profile to agree on the height. The front view can make a tall curl arrangement look shallower than it really is.
Length matters in two ways. The hair at the crown needs enough length to roll into the desired size, while the temples and area around the ears need a closer shape. A curl also takes up length as it rolls, so a straight measurement alone gives little indication of the finished profile. Ask how the maker measures length and where the finished curls will sit. If you are buying a wig to have it cut and set locally, let the stylist confirm there is enough hair to make the rosettes before placing the order.
Illustrative Prices for a Sculpted Pixie Wig
Use these USD ranges to compare what different orders might include. They are illustrative estimates. Materials, cap construction, color work, customization, location, supplier, shipping, and installation can change the final cost. Ask for an itemized quote so you can compare a pre-styled unit with a custom order that includes a fitting and detailed temple work.
| Category | Illustrative Price Range | Potential Scope |
|---|---|---|
| Premium Custom | USD 400–800+ | Made-to-measure cap, custom color, carefully placed crown rosettes, and detailed hairline work. Fittings may be included. |
| Standard Custom | USD 230–430 | Short unit customized for a fixed side part, selected shade, and coordinated curl and wave placement. |
| Basic Human Hair | USD 110–240 | Short human hair unit that may need a separate cut, curl set, or hairline appointment. |
| Premium Synthetic | USD 55–130 | Pre-styled synthetic pixie with a more detailed curl pattern or part, depending on the model. |
| Basic Synthetic | USD 20–60 | Budget short wig with a similar outline and simpler crown or edge styling. |
Keeping the Crown and Finger Waves in Shape
Handle the wig by the cap when putting it on or taking it off. If a rosette needs a small adjustment, lift and settle that curl with your fingertips. Brushing across the whole crown can open several loops at once and soften the pattern. At the front, use a light touch with any compatible styling product. Repeated layers can dry visibly along the scallops, especially on black or deep blue hair. Keep lace away from the pressure of fingernails when lifting the perimeter or cleaning off product.
After each wear, check the inside of the cap and the hairline for makeup transfer, perspiration, or styling residue. Let the unit air before storing it. If you wear it often, look over the waves and crown once a week so you can catch a loosened section before it spreads. Wash according to the maker’s directions, taking wear frequency and buildup into account. Ask how to clean the perimeter separately if the style is still holding well and only the edge needs attention.
Use products suited to the fiber and follow the care instructions for drying. If air drying is recommended, support the cap on a stand and leave the curls room to hold their shape. A human hair wig may need its loops reset after washing, especially if the original styling relied on a wet set. Some synthetic units retain a preset curl pattern with compatible care. Heat limits vary, so check the label or ask the supplier before using an iron, hot water, or a dryer. For colored human hair, follow the maker’s advice on color care. On lighter shades, pay particular attention to makeup and tinted product transfer near the hairline.
Store the pixie upright when you can, with room around the sideburns and enough clearance above the crown. For travel, use a firm container with space around the top and support the cap from inside so the rosettes stay uncompressed. If several curls have loosened or the front waves have separated, a professional touch-up can restore the pattern in one appointment. Bring a photo from the original fitting so the stylist can see where the curls and part sat when the shape was fresh.
What to Consider Before Choosing This Style
The short shape leaves the ears and neckline open, making it easy to show earrings or wear a higher collar. The crown is decorative enough to carry an outfit on its own, and color gives you room to change the effect while keeping a familiar fit. Chocolate brown can let the shape blend more gently into an everyday look. Copper, platinum, and blue can make the curl work more prominent in photographs.
The main trade-off is the care the details require. A close-fitting hat can flatten the crown, a poor cap fit can shift the part, and reshaping the waves may take a stylist who regularly works with short units. Think about how you will wear and store the wig before committing to the most intricate finish. If you wear glasses every day or travel with your wig, a lower temple curl and a slightly smaller crown can give you the same scalloped silhouette with more clearance where you need it.
Search Terms
rosette curl pixie wig · scalloped hairline pixie · side part finger wave wig · black sculpted curl pixie · honey blonde rosette wig · burgundy pixie with kiss curls · platinum pin curl wig · copper finger wave pixie