
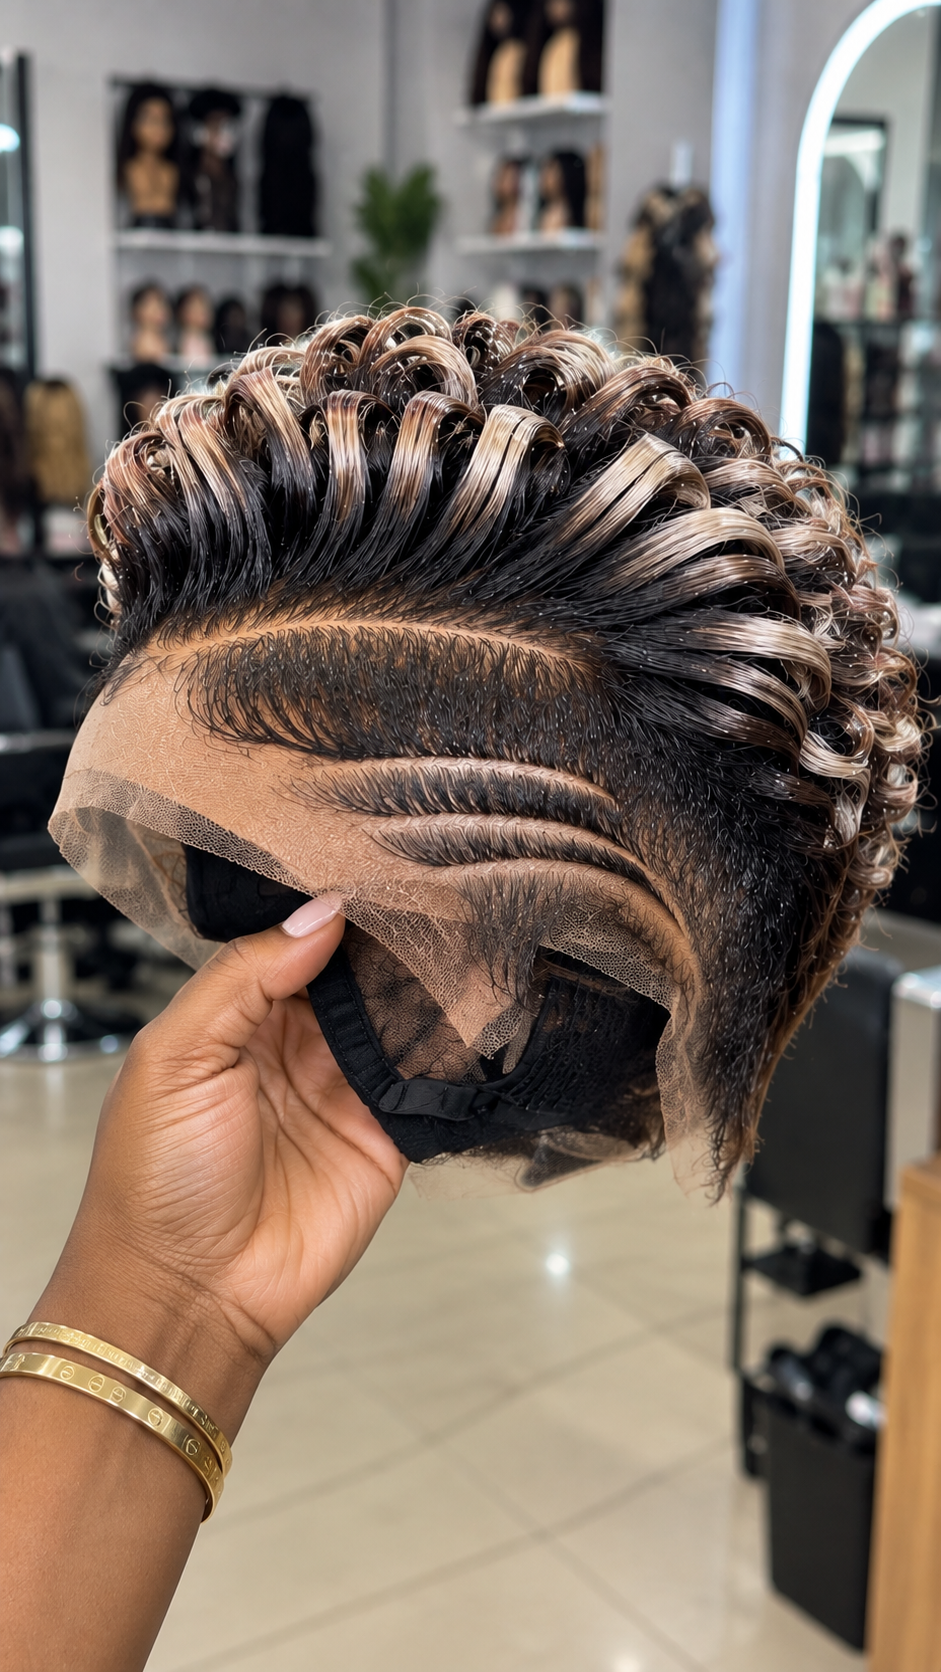
This wig is built around contrast, but the contrast does not come from simply placing a light color over dark hair. The visual impact comes from the way pale champagne-beige sections travel through a deep black foundation, following the direction of large sculpted loops across the crown. Along the side, a broad dark panel is divided by three curved channels that create a completely different focal point below the elevated upper structure. The photograph also exposes the lace and part of the cap interior, making it useful for anyone who wants to discuss both appearance and construction with a wig stylist.
The upper hair has a strong architectural quality. Broad sections rise from the root area, bend backward and form open loops rather than compact ringlets. Light-colored strands are concentrated across selected portions of those loops, producing alternating bands of black, smoky beige and pale champagne. Because the highlights follow the movement of the hair instead of appearing as random streaks, they help explain the direction of the style at a glance.
The side tells another story. A long separation runs beneath the crown, creating a boundary between the elevated hair and the close-set panel below it. Under that panel, three curved lines sweep toward the rear. Their spacing and gradually changing lengths give the lower section a layered graphic appearance that should be preserved if this exact reference is being commissioned.
Champagne Placement Is Part of the Construction
The pale sections should not be treated as a general blonde blend. Their location is closely connected to the loop pattern. Several upper sections begin predominantly dark near the roots and reveal lighter strands as they bend over the crown. Other loops carry a broader pale band, especially toward the right and rear portions visible in the photograph.
This placement creates an important rhythm. The viewer sees black roots first, followed by lighter surfaces at the highest points of selected loops, then darker recesses underneath. That alternating sequence makes the crown appear layered without requiring several unrelated colors.
The light shade itself sits somewhere visually between champagne blonde, pearl beige and a muted ash-beige tone under the salon lighting. A photograph cannot provide an exact manufacturer color code, so a buyer should avoid ordering solely from a color name. Sending this reference and requesting a physical swatch or a photograph of the available fiber beside the reference is a safer approach.
The black foundation is equally important. It anchors the pale sections and prevents the upper design from becoming uniformly light. Removing too much of the black would change the balance of the wig and reduce the strong separation between the crown and side panel.
Broad Ribbon Loops Create the Upper Silhouette
The crown is made from large elongated sections that resemble folded ribbons. Near the front, they rise steeply before bending backward. Moving toward the middle, the loops begin to lean farther toward the rear. Around the back, the construction becomes increasingly curved and compact.
This progression creates a controlled silhouette. Height is concentrated toward the front and upper middle rather than distributed equally across the entire head. The rear receives enough volume to continue the pattern without competing with the front elevation.
A stylist recreating this wig should pay attention to section width. If the strands are divided into very small groups, the result may resemble tight curls or individual coils. The reference uses noticeably broader groups. Each section carries enough hair to create a visible ribbon-like surface where both the black base and champagne accents can be seen.
Direction is another key point. The sections are not standing independently in random orientations. They participate in a continuous backward movement. This is why the crown looks organized even though there are many individual loops.
The Lower Panel Changes the Visual Weight of the Wig
Beneath the crown sits a substantial dark side panel. Its close-set hair creates a dense visual field that contrasts with the open spaces inside the loops above. The difference in scale between these two zones gives the design much of its personality.
The upper boundary of this panel follows the long separation underneath the crown. That line travels diagonally and helps establish where the elevated sections begin. The lower portion then extends toward the lace perimeter, where the density gradually becomes finer.
This side panel should not be treated as empty space between the crown and decorative lines. It is an active part of the composition. Its width provides enough dark area for the lighter channels to remain clearly visible.
When requesting a custom version, show the stylist the full side view rather than cropping the photograph around the crown. The proportion of the panel matters just as much as the loops. Making it too narrow would push the curved channels together, while making it excessively wide could reduce the visual dominance of the crown.
Three Curved Channels Create the Signature Side Pattern
The lower side displays three separate curved channels. They do not have identical lengths or identical curvature. Instead, they work as a descending group, with the upper line extending farther and the lower lines following the same general direction at different levels.
Dark hair remains between each channel. This separation is essential because it allows the eye to identify three individual lines rather than one wide carved area. The spacing also gives the design depth when viewed from the side.
The channels begin near the forward portion of the side panel and travel backward in a gentle sweep. Their movement complements the backward direction of the crown. Even though the crown and side use very different styling techniques, they share a common directional language.
For a custom order, describe this specifically as a triple curved side-line arrangement. A generic request for “lines on the side” could result in straight stripes, equal-length cuts or a completely different pattern. The reference photograph should remain the primary guide for angle, spacing and placement.
Why the Dark-to-Light Balance Works From Multiple Angles
The color distribution is particularly effective because the pale shade is not spread evenly across every visible strand. Some loops remain predominantly black. Others contain narrow champagne accents, while a few sections show a larger light surface. This irregular distribution keeps the color from looking mechanically striped.
From a front-side angle, the lighter sections emphasize the height of the loops. From above, they would help reveal the path each section takes across the crown. From the rear, the lighter tips and bends can make the transition into the compact back pattern easier to see.
The side panel remains almost entirely dark, which prevents the color treatment from competing with the triple channels. This creates two separate points of interest: color and elevation above, line work below.
Anyone commissioning this piece should therefore resist the temptation to add blonde throughout the lower side. Doing so would significantly alter the graphic relationship visible in the reference.
The Lace Perimeter Is Clearly Visible Before Installation
The photograph shows mesh extending beyond the front and side perimeter. This indicates that the lace has not yet been fully prepared for wear. The visible excess gives an installer room to position the unit before making final adjustments.
The image confirms the presence of lace, but it does not reliably establish a commercial lace classification. Terms such as HD lace should only be used when the maker or supplier has confirmed the actual material. Camera sharpening, lighting and the skin or hand behind the mesh can make different lace types appear similar in photographs.
The lace shade should also be discussed directly with the seller. A shade that appears suitable while the wig is being held may behave differently against the wearer’s skin once the unit is installed.
If purchasing remotely, request an unfiltered close photograph of the lace against skin in natural light. This gives the buyer and installer more useful information than relying only on a heavily lit salon photograph.
What the Interior View Reveals About Fit
Part of the internal foundation is visible beneath the lace. A dark cap structure and fitting components can be seen inside the unit. The angle does not expose every element, so the exact cap specification should be confirmed before purchase.
This matters because decorative placement depends on fit. The champagne loops, long separation and triple side curves have intended positions. If the cap is substantially too large or too small, those details may sit differently on the wearer than they do in the reference.
Ask the wig maker which measurements are required before production. Circumference is important, but ear-to-ear, front-to-nape and temple measurements may also be requested depending on the maker’s construction method.
Buyers should additionally ask about adjustment hardware, interior combs and any other attachment components. These details affect wearing options but cannot be fully determined from this single exterior photograph.
Matching This Design to a Professional Stylist
This is a useful reference to send before booking rather than after arriving at the salon. The stylist needs to know that the job involves several separate skills: controlled loop formation, selective color placement, a long structural separation, dense side work and a three-channel pattern.
When reviewing a stylist’s portfolio, look beyond basic wig installations. Search for examples showing sculpted crowns and precision side detailing. A stylist who regularly works with structured units is more likely to understand why the size and direction of the loops cannot be changed casually.
For a remote commission, ask whether the same person will construct and style the unit. If different professionals handle those stages, make sure both have access to the reference photograph and the agreed specifications.
Before paying the final balance, request photographs from several angles. The decorated side is especially important because a front-facing photograph could hide the triple curves entirely.
Ordering This Look Without Losing Its Character
Begin the order by describing the color relationship rather than simply requesting a blonde-and-black wig. Specify a predominantly black foundation with selective champagne or pearl-beige accents following the broad crown loops.
Next, discuss the upper form. Explain that the front requires larger upright ribbon loops that progressively lean backward. Mention that the back should become more compact instead of maintaining maximum height from front to rear.
The side specification should be handled separately. Request the long diagonal separation beneath the crown, followed by a substantial dark panel and three curved channels with visible hair between them.
Finally, confirm cap measurements, lace material, lace shade and internal fitting components. Keeping these construction details separate from the aesthetic description makes it easier to verify each requirement before production begins.
What to Check in Approval Photos
Start with the color. Champagne sections should appear integrated into selected loops rather than scattered randomly across the wig. There should still be enough black hair visible to maintain the dark foundation seen in the reference.
Then inspect the loop scale. The front sections should look broad and elevated. If they have been divided into many tiny curls, the stylist has changed the central character of the design.
Move to the side panel and count the channels. There should be three clearly separated curves. Check their spacing and make sure the surrounding dark hair remains dense enough for the lines to be visible.
Finally, request an interior photograph before shipment. Verify the cap size and any agreed fitting components. If installation will happen elsewhere, forward these images to the installer so potential concerns can be discussed before the appointment.
Protecting the Sculpted Sections Between Wears
The crown should be stored with enough vertical and side clearance to prevent the loops from being compressed. A wig stand that supports the cap without pressing against the upper sections is preferable to placing the unit beneath other items.
Avoid pulling a brush through the large loop groups. Their appearance depends on strands remaining organized within broad sections. Excessive brushing can separate the pale and dark strands and reduce the ribbon effect.
The correct product routine depends on whether the unit is made from human hair or synthetic fiber. That cannot be determined confidently from the photograph alone. Confirm the fiber with the seller before using heat, setting products or chemical treatments.
The lace perimeter also deserves careful handling. When the wig is off the head, avoid pulling the mesh while lifting or repositioning the unit. Holding the cap foundation rather than repeatedly tugging the lace can help reduce unnecessary stress on the perimeter.
Premium Custom / Standard Custom / Basic Human Hair / Premium Synthetic / Basic Synthetic
| Wig Category | Estimated Range | Possible Customization Level |
|---|---|---|
| Premium Custom | $450–$950+ | Custom measurements, advanced crown sculpting, selective color work, lace construction and detailed side pattern |
| Standard Custom | $280–$480 | Personalized cap sizing, champagne accent placement, ribbon loops and triple curved channels |
| Basic Human Hair | $180–$320 | Human-hair foundation with styling and specialty side work potentially charged separately |
| Premium Synthetic | $110–$230 | Higher-grade fiber with pre-shaped loops and selected custom detailing |
| Basic Synthetic | $60–$130 | Standard fiber with more limited customization and simpler cap options |
These figures are general planning ranges rather than the confirmed price of the photographed unit. Hair or fiber quality, lace choice, cap construction, color work, labor, location and installation services can all change the final quote. Ask whether the price includes styling and installation before paying a deposit.
Booking and Purchase Checklist for This Exact Reference
Send the uncropped reference to the salon or wig maker and identify the details that matter most: black foundation, champagne-beige accent ribbons, elevated loop crown, diagonal structural part, dense dark side panel and three curved channels.
Ask whether the professional can reproduce those elements before booking. Confirm the fiber, cap size, lace specification, production time and whether installation is available. If color matching is important, request a swatch or sample photograph before the unit is completed.
For commissioned work, agree on an approval stage. A side photograph, crown photograph, rear view and interior cap image provide much better protection against misunderstandings than a single final photo.
This reference succeeds because every visible element has a specific role. The champagne accents reveal the movement of the broad loops, the black foundation creates depth, the diagonal separation divides the upper and lower zones, and the three curved channels give the side its unmistakable identity. Preserving that relationship is more important than simply matching one color or one curl.
Search Terms
champagne ribbon loop wig · black and pearl beige crown wig · triple curved side line wig · diagonal part lace wig · black base champagne loop crown · sculpted ribbon loop lace unit · three channel side design wig · pearl beige highlighted crown wig