
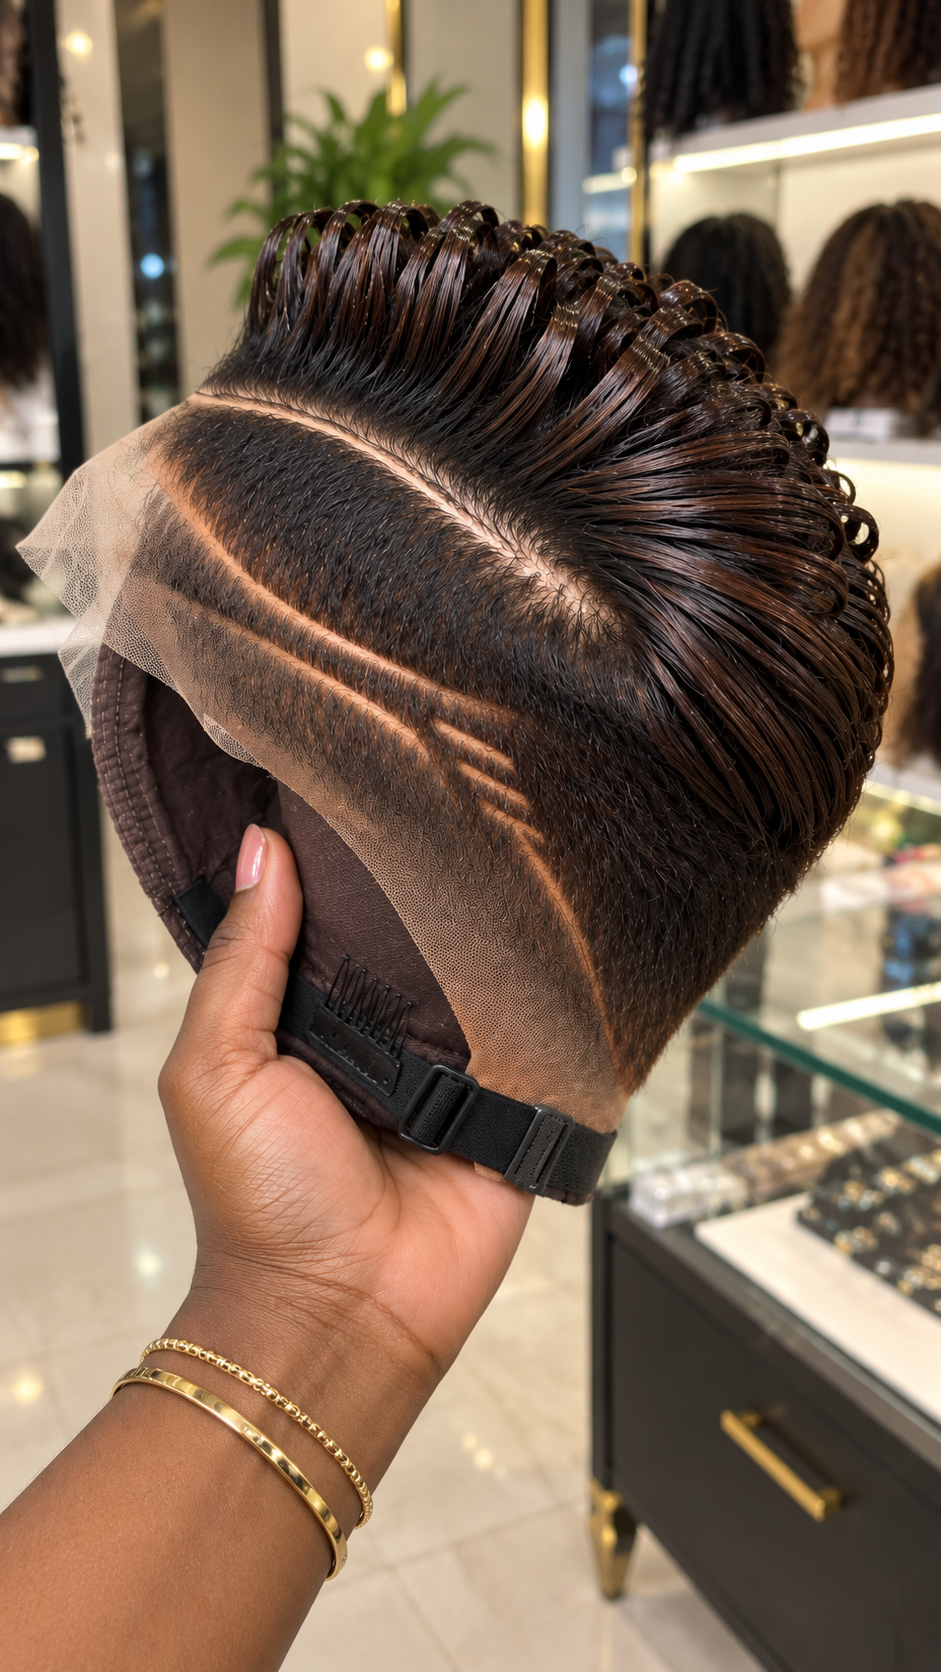
Deep espresso color gives this sculpted wig a completely different personality from high-contrast highlighted designs. Instead of relying on a bright accent shade to create separation, the unit uses light reflection, directional styling and carefully planned side detailing. The crown rises into a sequence of glossy ribbon-like loops, while the lower side stays close and dense before being interrupted by a long sweeping channel and three narrow parallel lines. The result is a design in which structure does most of the visual work.
The photograph is particularly useful for anyone planning a custom wig because several construction details remain visible before installation. The lace extends around the perimeter, part of the cap can be seen underneath, and an adjustable band with a small comb is visible near the lower interior. At the same time, the exterior styling has already been shaped enough to show exactly where the crown height, side division and line placement are intended to sit.
This is not a style that should be ordered using color alone. Asking for a dark brown curled wig would leave out the elements that make the reference distinctive. The direction of the upper sections, the length of the main side channel, the spacing of the three smaller lines and the relationship between the dark panel and the lace perimeter all need to be communicated to the maker.
Espresso Brown Creates Depth Without a Bright Highlight
The hair appears as a very deep espresso brown with warmer chocolate reflections becoming visible wherever salon lighting hits the raised loops. Some sections can look nearly black in shadow, while the upper surfaces reveal a richer brown tone. This variation comes largely from the way light travels across the glossy strands rather than from obvious contrasting streaks.
That tonal behavior is important when selecting hair for a similar unit. A flat black fiber would create a stronger, cooler result. A medium brown would make the entire wig noticeably lighter. The reference sits between those options, keeping a dark foundation while allowing brown warmth to appear across the elevated sections.
Because cameras and indoor lighting can shift brown shades considerably, buyers should not rely on the photograph to determine an exact commercial color number. Send the image to the supplier and ask to see available deep espresso, dark chocolate or black-brown samples under neutral lighting. Comparing physical swatches or unfiltered photographs is more reliable than choosing from a color name alone.
The consistency of the color is also part of the appeal. There are no obvious blonde, copper or silver ribbons competing with the sculpted pattern. This allows the shape of every loop to become the main attraction.
The Upper Sections Rise Before Folding Back Into the Crown
The crown construction follows a deliberate progression. Near the forward area, the hair lifts almost vertically before bending backward. Each section forms a broad loop with enough separation for the viewer to see its individual direction. Moving toward the rear, the loops become increasingly compact and begin feeding into the rounded back portion of the wig.
This creates height without turning the crown into a large uncontrolled mass. The elevation is concentrated along the upper ridge, while the rear remains closer to the overall head shape. That balance is especially important for someone who wants noticeable styling without excessive bulk.
The individual sections are wider than traditional tiny ringlets. They resemble folded ribbons because many strands travel together through the same curve. Their glossy surface makes those grouped strands easy to see. A stylist recreating the look would need to maintain those broad sections instead of separating them into numerous small curls.
From the side, the loop sequence also creates a repeating rhythm. The first sections rise prominently, the middle continues the pattern, and the rear gradually settles into tighter curved work. This transition gives the crown direction rather than making every section identical.
The Main Parting Acts as the Structural Border
A long exposed division runs beneath the crown and separates the elevated styling from the darker side panel. It begins toward the forward area and travels diagonally toward the back. Because the surrounding hair is dense and dark, the exposed line is easy to read even without contrasting color.
This division performs an important visual job. Above it, the eye sees height, loops and backward movement. Below it, the design becomes flatter and more graphic. The line therefore behaves like a boundary between two styling zones.
Its placement should not be improvised during a custom order. If positioned too high, the lower panel would become oversized and the crown could lose some of its presence. If placed too low, there would be insufficient room for the secondary line work. The proportions visible in the reference provide a useful guide for balancing those areas.
A buyer should send both this angled view and, if available, another side view to the stylist. The exact slope of the division is easier to understand from photographs than from a written measurement.
A Sweeping Side Channel Leads Into Three Fine Lines
The side work is one of the strongest identifiers in this particular design. Beneath the main division sits another exposed channel that travels across the dark panel in a gentle curve. Rather than ending abruptly, it guides the eye toward three much narrower parallel lines positioned closer to the rear side.
Those smaller lines are deliberately restrained. They do not occupy the entire side of the unit. Their placement near the end of the longer channel creates a layered effect: one dominant path establishes the direction, while the three fine marks add detail without overwhelming the dark surface.
The spacing between the narrow lines is as important as their number. They remain clearly separated, allowing dark hair to appear between them. If the lines were placed too closely together, they could visually merge into one wide opening. If they were spaced too far apart, the compact triple-line character would disappear.
When sending instructions to a wig maker, mention the long curved channel and the three narrow companion lines separately. A generic request for “lines on the side” could easily produce a different arrangement.
The Dense Lower Panel Makes the Line Work Readable
The side section surrounding the channels is intentionally dark and closely packed. That density gives the lighter exposed pathways enough contrast to remain visible. It also creates a strong visual foundation beneath the elevated crown.
This is a useful lesson when commissioning a similar unit. Decorative channels do not exist independently from the hair around them. Their visibility depends on the density, direction and color of the surrounding section. The deep espresso shade in this reference provides a particularly effective background.
The panel also follows the head shape rather than projecting outward. Keeping this area close prevents it from competing with the volume above. The crown provides height; the side provides graphic detail. Each area has a separate role.
If a custom maker proposes adding additional curls, highlights or ornaments throughout this panel, compare the suggestion carefully with the reference. Extra elements could reduce the clarity of the long channel and triple-line arrangement.
The Lace Perimeter Is Clearly Visible Before Installation
The photograph shows lace extending beyond the hair-bearing perimeter along the front and side. This is useful evidence that the unit includes a lace section intended to be fitted and prepared during installation. However, the image does not provide enough information to confirm a specific commercial lace grade.
For that reason, buyers should ask the seller directly about lace material, shade and coverage. Terms used by different suppliers are not always identical, and photographs can make fine mesh materials appear more similar than they actually are.
The lace color should also be discussed in relation to the intended wearer. A suitable match can help the perimeter integrate more naturally after professional preparation. The shade shown in a product photograph should not automatically be assumed to suit every complexion.
Before paying a deposit, request a close photograph of the actual lace used for the order. If the maker offers several lace shades, ask for them to be photographed against skin under ordinary light rather than relying only on a digital color chart.
The Visible Interior Gives Useful Clues About Fit
Part of the cap is exposed beneath the lace, and the photograph shows an adjustable strap along the lower interior. A small comb is also visible. These elements indicate that the foundation includes internal components designed to assist with positioning and fit.
Even so, a photograph cannot confirm whether the cap dimensions will suit a particular wearer. Head measurements remain important, especially with a design whose side decoration needs to land in a specific location.
If the circumference is incorrect, the unit may rotate or sit too far forward or backward. That would affect more than comfort. It could also move the long side channel and triple lines away from the position intended by the design.
Ask the seller which measurements are required before construction. Circumference is usually only one part of a custom fitting process. Follow the maker’s own measurement instructions because construction methods and size charts vary.
Ordering the Crown Requires Shape Instructions, Not Just Curl Instructions
A useful custom-order brief should explain that the crown needs broad upward loops arranged in a backward progression. Calling the hairstyle simply “curly” is too vague. Traditional curls could produce a completely different silhouette.
Point out that the forward loops have noticeable lift and that the sections gradually become more compact toward the rear. Ask the stylist to preserve the grouped-strand appearance rather than separating every strand into an individual curl.
It can also help to request progress photographs before the final setting is completed. At that stage, the stylist can show whether the height and direction resemble the reference. Correcting the overall crown structure early is generally easier than rebuilding it after every section has been secured.
When reviewing the progress photograph, concentrate on silhouette first. The loops should form a controlled ridge across the top instead of producing equal volume everywhere.
Choosing a Stylist for This Type of Construction
Look for a professional who can demonstrate previous work involving sculpted wig styling, detailed side patterns and lace-unit construction. Installing a standard wig and building a highly structured custom piece are different services.
Send the reference before booking and ask whether the stylist can reproduce the crown direction and the specific side arrangement. A professional should be able to discuss how those areas will be planned rather than treating them as last-minute additions.
Ask whether styling is completed before the fitting appointment or during the appointment. Also confirm whether lace preparation, cap adjustment and final placement are included in the quoted price.
If ordering remotely, establish an approval stage before shipping. Request photographs of the crown, decorated side, opposite side and interior. These views make it easier to identify a major difference before the unit leaves the maker.
What to Inspect Before Accepting the Finished Unit
Start with the color. The unit should remain predominantly deep espresso or dark chocolate rather than shifting into a noticeably lighter brown. Examine photographs taken in more than one lighting condition if possible.
Next, inspect the upper ridge. The broad loops should rise individually and then move backward in an organized sequence. Pay attention to whether the rear transition remains proportional instead of becoming excessively bulky.
Then inspect the main diagonal division. It should create a readable border between the crown and lower side panel. Beneath it, check the longer curved channel and confirm that the three narrower lines remain separate and correctly positioned.
Finally, inspect the lace and interior hardware. Confirm that the construction matches what was agreed upon and that any adjustable components are securely attached.
Preserving the Loop Pattern After Purchase
This type of crown should be stored with enough open space above it. Compressing the loops beneath other wigs, boxes or clothing can change their shape and reduce the height that gives the design its profile.
Avoid repeatedly brushing through the sculpted sections. The hair has been intentionally grouped into broad loops, and aggressive brushing can separate those groups. Instead, follow the maintenance instructions provided by the stylist who made the unit.
Heat recommendations depend on the actual fiber. The photograph cannot establish whether this particular unit uses human hair, synthetic fiber or a blend. Never assume that a styling temperature suitable for one material is safe for another.
The exposed lace should also be protected during storage. Keep jewelry, pins and rough surfaces away from the mesh, and handle the unit primarily through its cap rather than repeatedly pulling on the loose lace perimeter.
Premium Custom / Standard Custom / Basic Human Hair / Premium Synthetic / Basic Synthetic
| Category | Planning Range | Possible Service Level |
|---|---|---|
| Premium Custom | $475–$950+ | Personal sizing, deep espresso color matching, sculpted loop crown, precision side channels, lace construction and detailed finishing |
| Standard Custom | $290–$500 | Custom cap options, structured crown work, side-panel detailing and tailored color selection |
| Basic Human Hair | $185–$330 | Human-hair foundation with specialty sculpting and line work potentially charged separately |
| Premium Synthetic | $115–$225 | Higher-grade synthetic foundation with pre-set loops and selected customization options |
| Basic Synthetic | $60–$135 | Entry-level foundation with simplified crown shaping and fewer personalized construction choices |
These figures are general planning ranges rather than the confirmed price of the unit pictured. Hair source, fiber grade, cap construction, lace selection, styling labor, location, customization and installation can all change the final cost. Request a complete written quote before ordering.
Turning This Reference Into a Precise Booking Request
Send the full photograph to the stylist and describe the color as deep espresso or dark chocolate with no prominent contrasting highlight. Explain that the crown must use broad glossy loops that rise from the upper section and travel backward in a controlled sequence.
Identify the long diagonal division beneath the crown as a required structural detail. Below it, specify a dense dark side panel containing one sweeping channel followed by three narrow parallel lines. Ask the stylist to preserve the spacing and proportions shown in the reference rather than substituting a different line pattern.
Discuss lace type and shade directly because the photograph does not confirm a specific lace grade. Provide the measurements requested by the maker and confirm the internal adjustment system, production time, deposit terms, shipping arrangements and installation options before payment.
Most importantly, request approval photographs before the order is finalized. The crown should be checked from above and from the side, while the decorative panel needs a clear side view. This design succeeds through proportion: deep espresso color supplies depth, the elevated loops create movement, the diagonal division organizes the structure, and the triple-line detail gives the lower panel its recognizable signature.
Search Terms
deep espresso loop wig · dark chocolate sculpted crown wig · triple side line lace wig · espresso ribbon loop hairstyle · curved side channel wig · dark brown lace perimeter wig · three parallel line wig design · glossy chocolate crown loops